Blogging has been around since the late 1990s and has become one of the most popular mediums for people to express their thoughts, share information, and generate income. If you’re thinking of starting a blog of your own, it’s important to understand the steps needed to be successful. In this post, we’ll provide a step-by-step guide on how to start a blog. So, let’s dive in and explore the possibilities.
What is a Blog?
A blog is an online platform where you can regularly publish and share content. It acts as a digital journal or online diary, allowing people to express ideas, experiences, tutorials, or opinions on various subjects. They can cover multiple topics, provide a space for writers to connect with others, and create a community around published content. With the ability to incorporate text, images, videos, and interactive elements, blogs offer a dynamic and accessible resource for sharing information and fostering an online community.
One of the most popular platforms for a blog is WordPress. There are two iterations of WordPress: .org and .com. Either one will suit your needs, but it’s important to understand their differences. WordPress.org is a self-hosted solution, which means you install and host the software on a WordPress hosting provider. On the other hand, WordPress.com offers a blogging platform with its own hosting, which can be a solid choice for beginners. For this tutorial, we will focus on the .org version of WordPress and walk you through the steps to launch your online blog.
How To Start a Blog: Step by Step
To succeed at blogging, it’s important to set goals, determine who you intend to cater to, and pay attention to more technical considerations. These include picking the right host, choosing a worthy platform, and incorporating all the moving parts needed to support your efforts.
Step 1: Setting a Goal for Your Blog
The first and most important step in the process is planning. Sit down and list what you’d like to accomplish with your blog. Are you interested in monetizing your blog? If so, research how you want to turn your blog into a money-making machine. Consider whether you want to run ads directly on your blog or use other methods, such as Google Adsense. You can also incorporate a good advertising plugin that will allow you to create and host banner ads on your blog quite easily.
Consider creating an informational blog if monetization isn’t in the cards right now. These types of blogs are a great source of information and tend to perform well in search results; that is, if your SEO copywriting is up to par.
Lastly, decide whether to incorporate social media into your blog. Having a social media presence on your website is a wonderful way to drive more traffic to your website. There are a lot of excellent social media plugins available that will allow you to embed social feeds, schedule posts to Facebook, or incorporate events.
Step 2: Picking a Niche
The next thing to evaluate is whether you want a lifestyle blog that encompasses various topics or drill it down to be more of a niche blog. In general, niche blogs are great for people looking for specific information on a topic versus a more generalized lifestyle blog. There are several benefits to creating a niche blog, including appealing to individuals with particular interests, being excellent for building email lists, and, most importantly, being easier to manage.
Step 3: Picking Your Domain
The next crucial step in the process involves securing a domain name, which plays a pivotal role in shaping your online presence. When choosing a domain for your business, it’s important to ensure that it is both memorable and easy to spell, while accurately reflecting your business’s niche. While various top-level domain (TLD) extensions are available besides .com, opting for this widely utilized TLD is often best due to its trustworthiness. However, alternatives like .net or .org can also be considered, particularly if your preferred domain with the .com extension is unavailable.
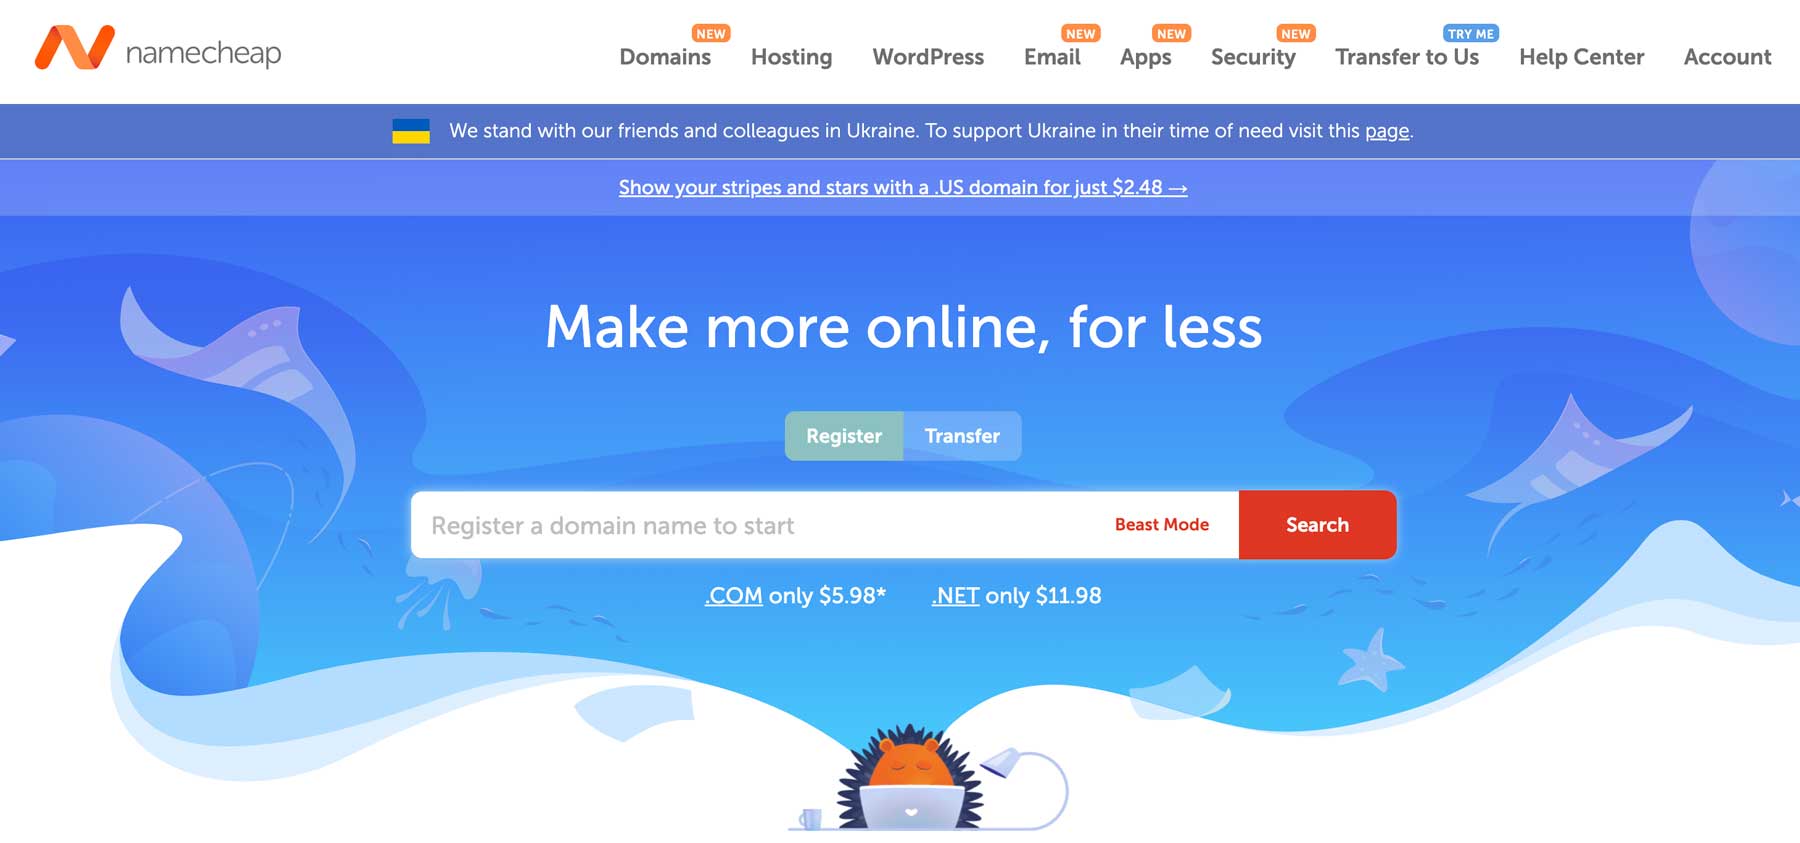
In certain cases, it is possible to acquire a domain that has already been taken, although this can be challenging, especially if the desired domain already has an associated website. To explore available domains, we recommend using a reputable domain name registrar such as Namecheap.
Step 4: Choosing Your Hosting

Once you’ve planned out your blog and chosen a niche and a domain, you’ll need to find a good hosting provider. Generally speaking, you’ll want to avoid free hosting platforms and opt for a good managed hosting provider like SiteGround, because they offer the most bang for your buck. Not only do they provide competitive pricing, but they’re one of the fastest hosting companies you can get.
A fast host is crucial to your blog’s success for several reasons. First, no one likes a slow website. Potential readers who land on your site and wait for the page to load aren’t going to stick around. Secondly, a fast website is good for search engine optimization (SEO). Because Google and other search engines prioritize speed, going for a quality host is in your best interest.
Step 5: Create Your Blog
Now that you have all of the necessary moving parts in place, it’s time to start the exciting process of creating your blog. In this section, we’ll advise you on the best blogging platform to use, recommend a good theme and plugins, and walk you through the process of setting up your categories, tags, and templates.
Pick a Platform
While there are many blogging platforms to choose from, they are still far from matching the versatility of WordPress.org. With full site editing capabilities and a platform that was built for blogging, WordPress is the way to go. It’s free to use, has a huge following, and provides endless customization options. Plus, it’s relatively easy to learn, making it a great solution for beginners.
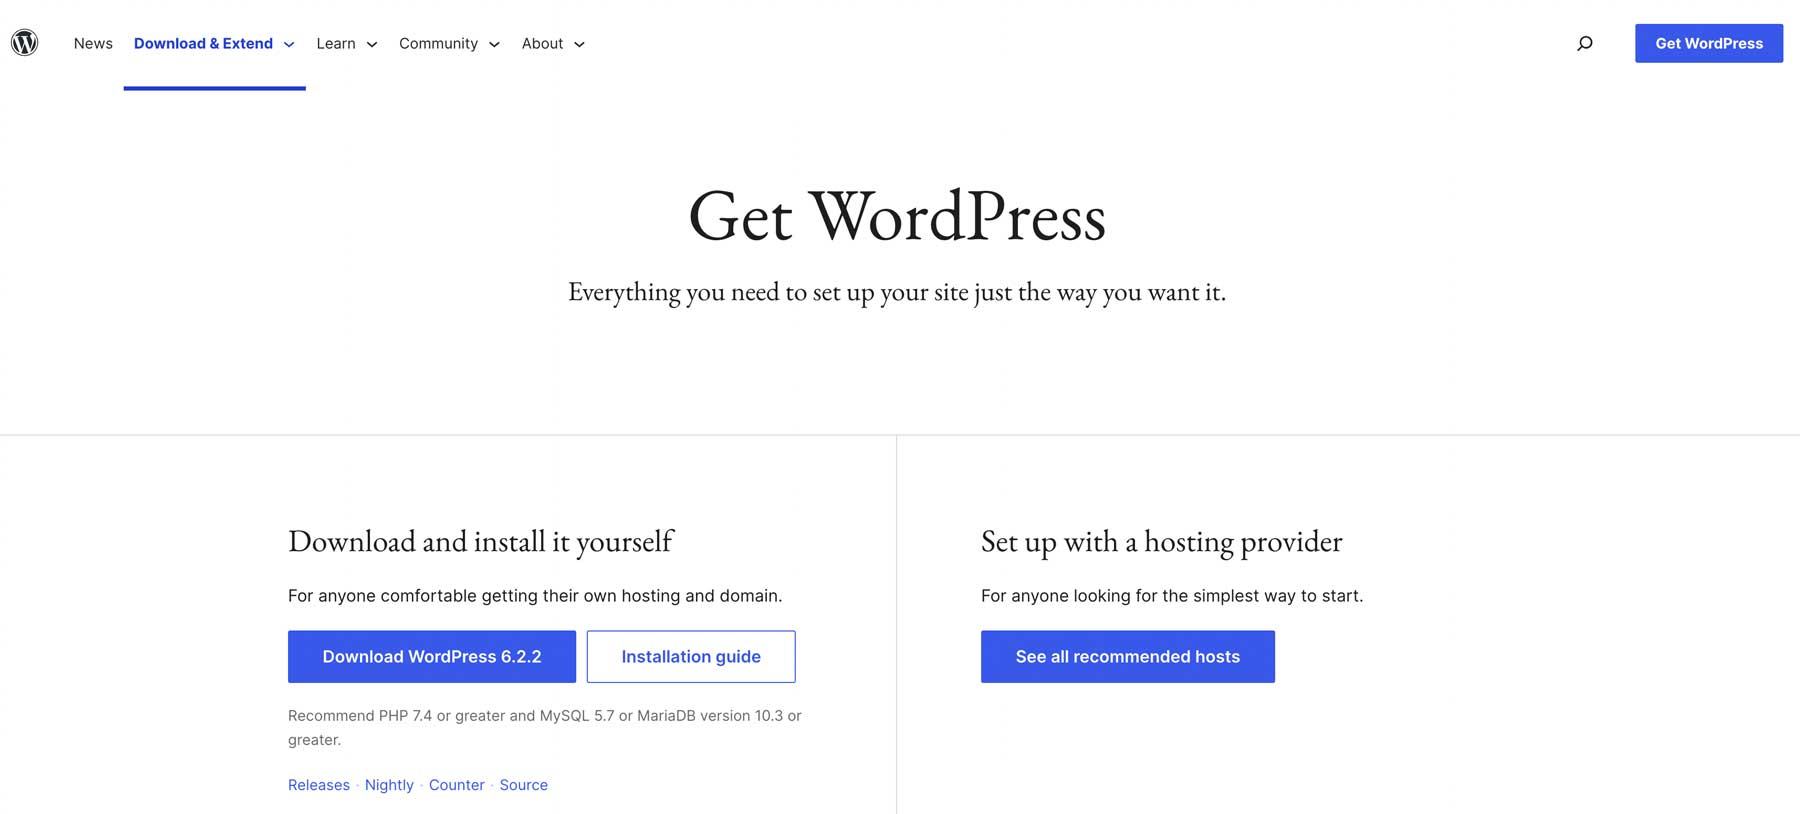
When it comes to installing WordPress, you can usually leave the dirty work to your web host. The best WordPress hosting providers will install WordPress for you when you set up your account, making your life a lot easier. However, that also depends on the hosting you choose. Most VPS hosting or dedicated hosting companies won’t offer this feature, requiring you to install it on your own through cPanel.
Pick a Theme

Now that we’ve opted for WordPress.org as a place to build our masterpiece, we’re going to need a good WordPress theme for bloggers. Although we may seem a bit biased, Divi is the absolute best solution. With the ability to create pages using a no-code Visual Builder incorporating more than 200 design elements, Divi is capable of showcasing your blog beautifully.
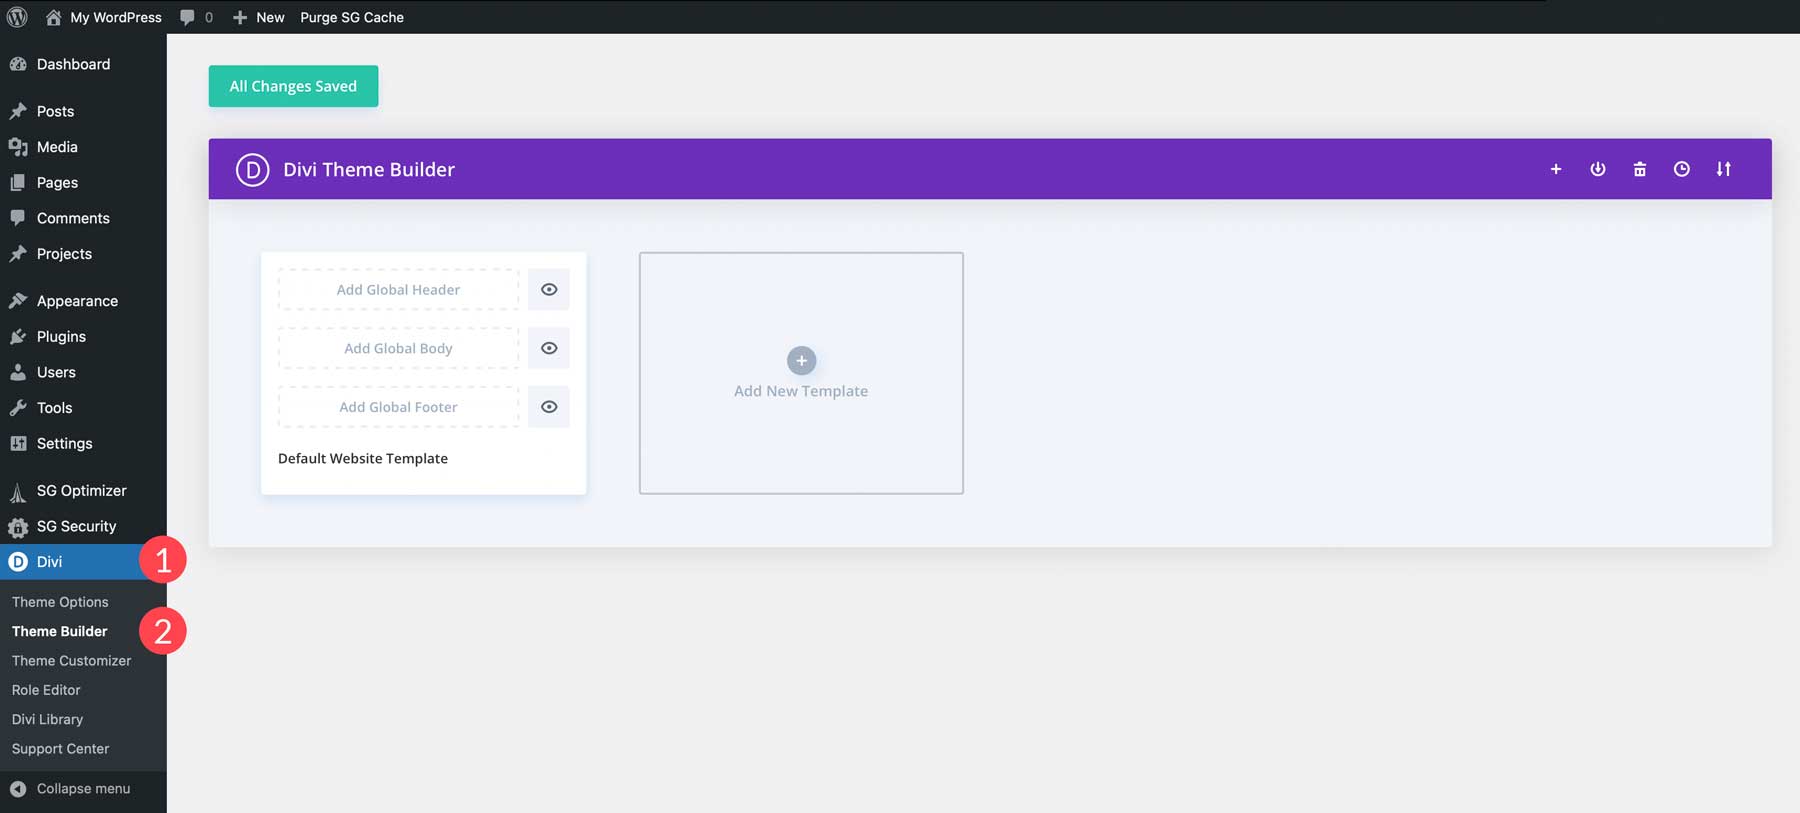
Plus, you’ll gain the benefit of full site editing, which allows you to create custom templates for your posts, categories, tags, and more, through Divi’s Theme Builder.
Install Key Plugins
One of the best aspects of WordPress is the ability to install plugins. They add features and functionalities to your site, allowing you to build any website you wish. For example, if you’d like your blog to have gated content, you can install a membership plugin, set up a paywall, and you’re off to the races. There are plugins for literally anything you can fathom. You can get a little help getting seen in the search engines by installing a good SEO plugin, such as Rank Math.
Furthermore, you can track how your posts are performing by incorporating a plugin such as MonsterInsights, which provides crucial information on what’s working on your site and what’s not. This is especially important when you’re just starting out. No matter what you want your site to do for you, there’s a plugin for it. To help you determine what you need, take a look at our article, 31 Best WordPress Plugins in 2023 (Everything You Need).
Set Up Categories
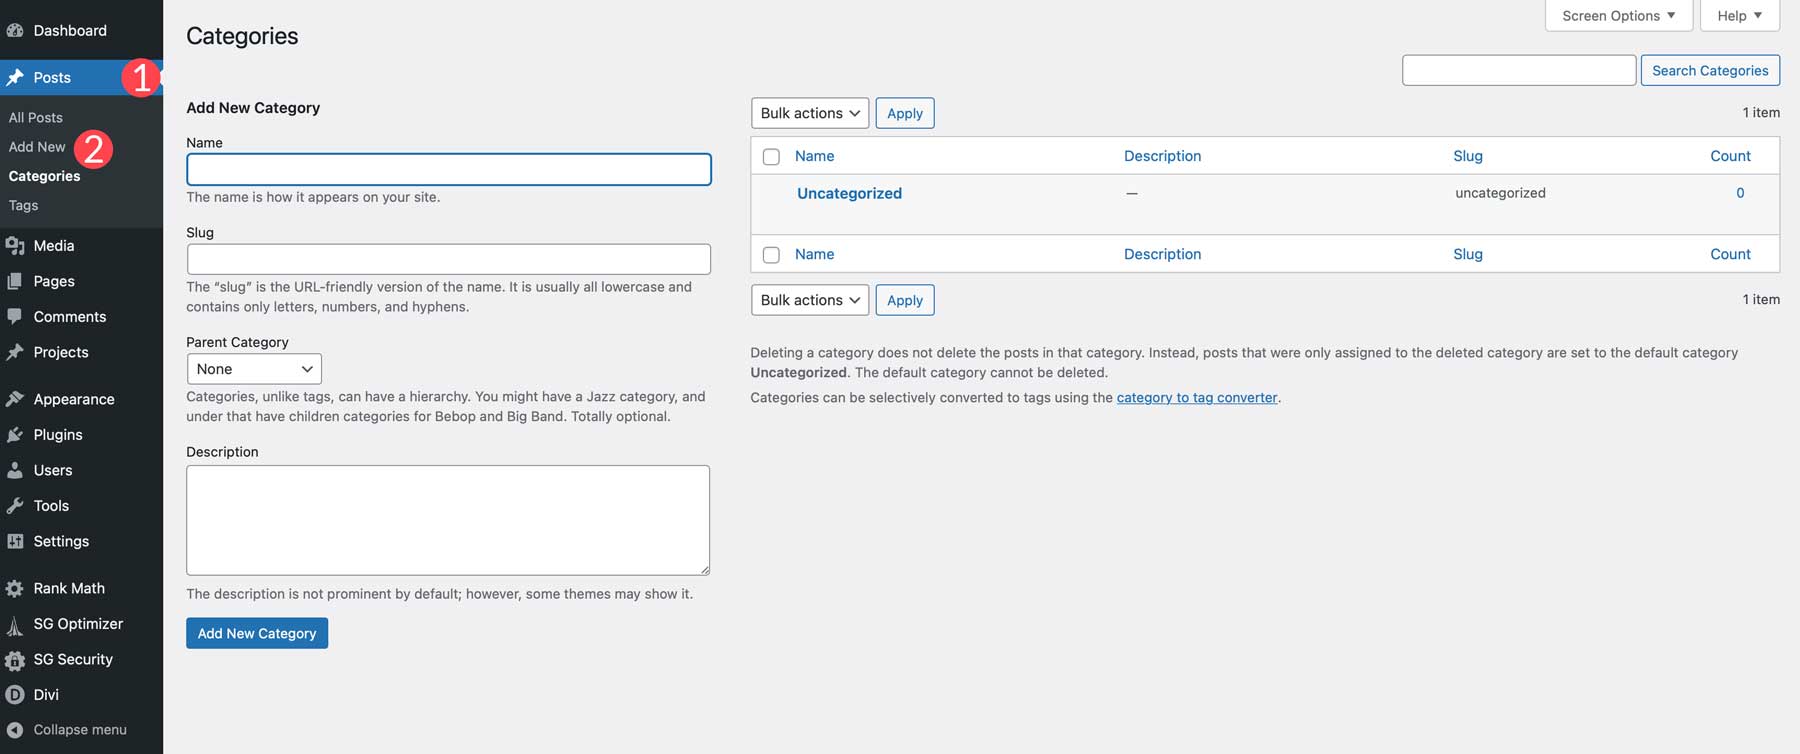
Before you can start writing posts, you’ll need to create categories. Using categories is an essential part of SEO and, if done correctly, can help bring traffic to your website. For example, let’s say you’re building a blog about pets. You’ll want to create categories for the types of pets you want to write about and subcategories that would pertain to those pets.
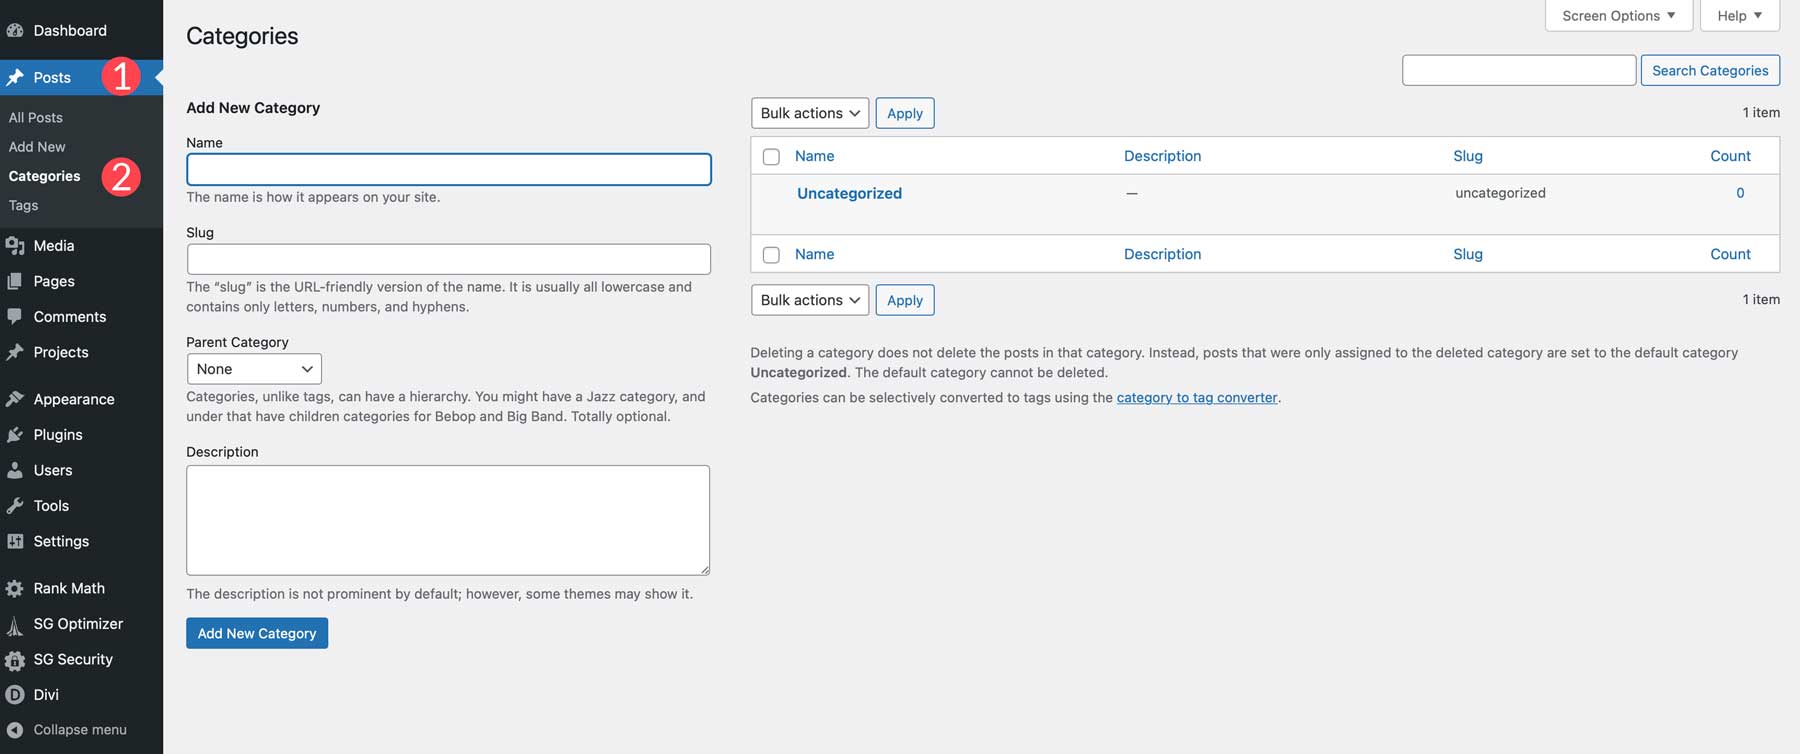
To add categories, navigate to the WordPress dashboard, then hover over posts. Next, click categories.
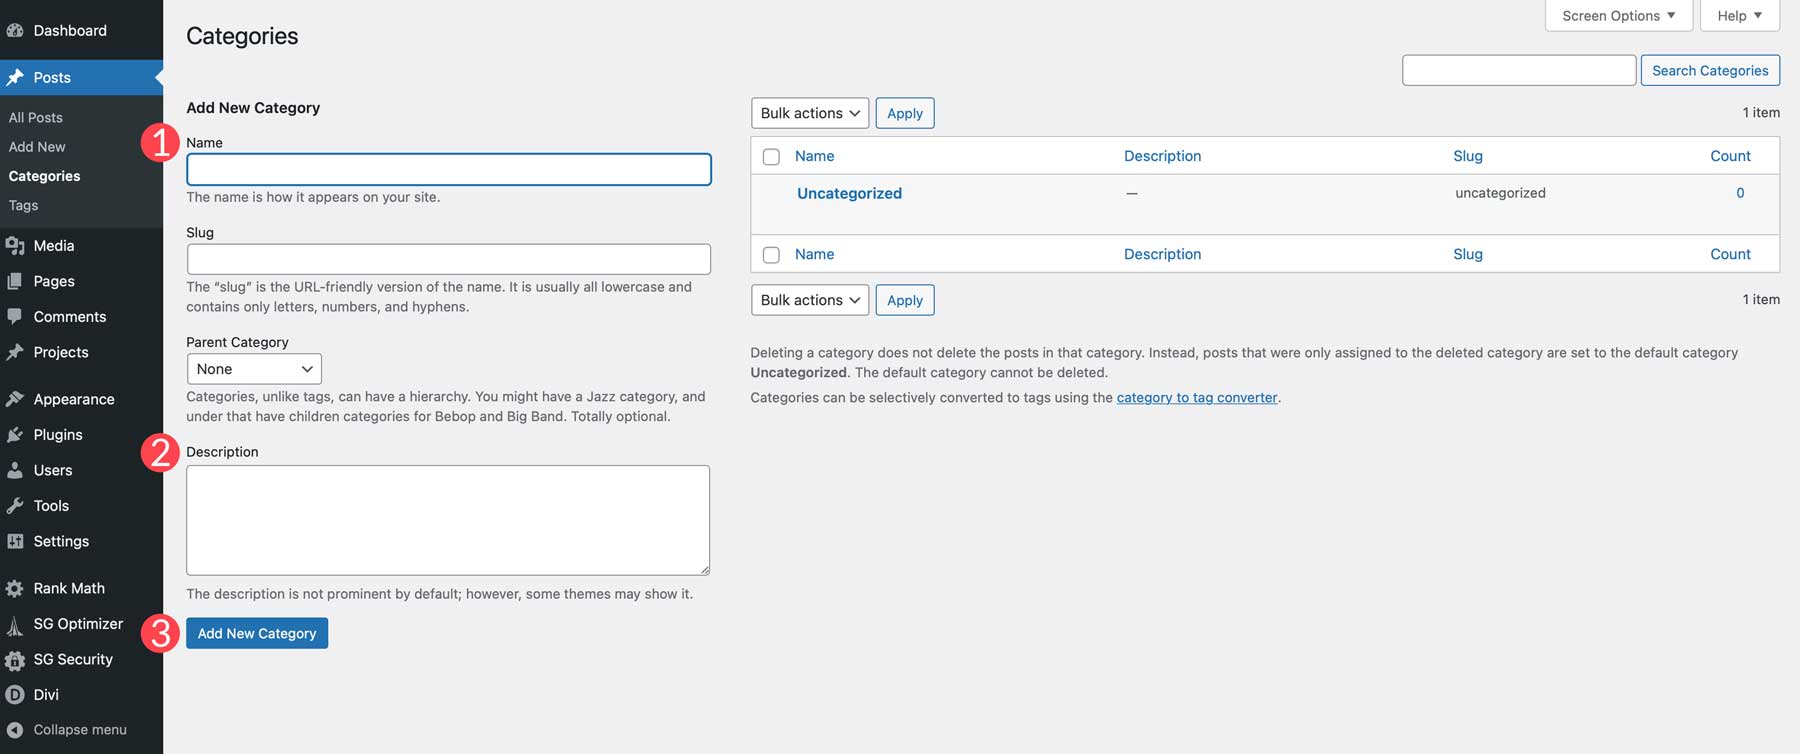
The next step is to give your new category a name, add a description, then click Add New Category.
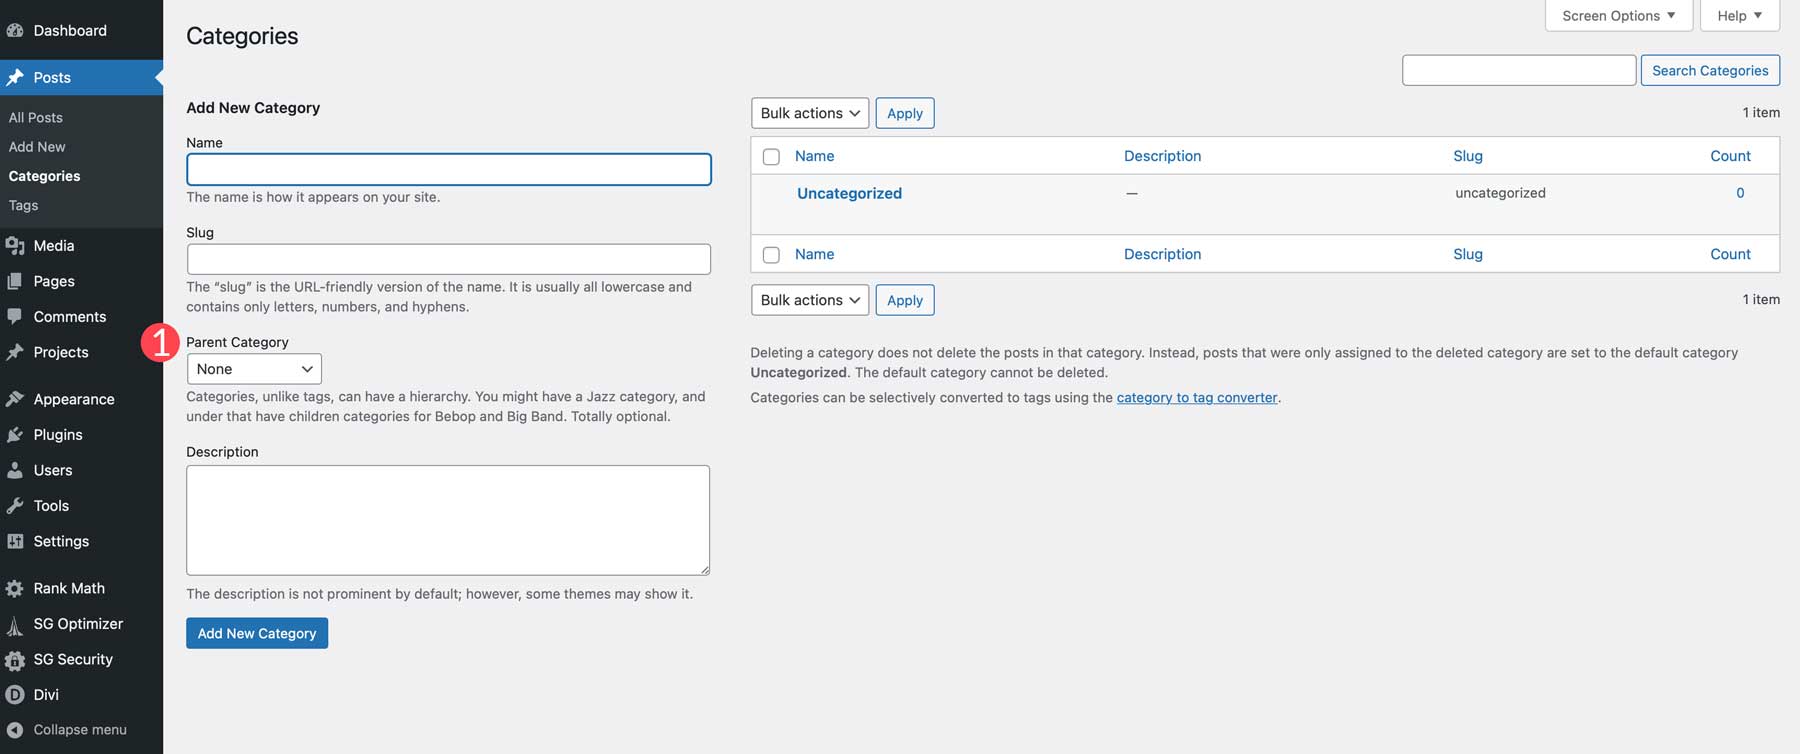
Once you have created a main category, you can create new top-level categories or subcategories by assigning a parent category.
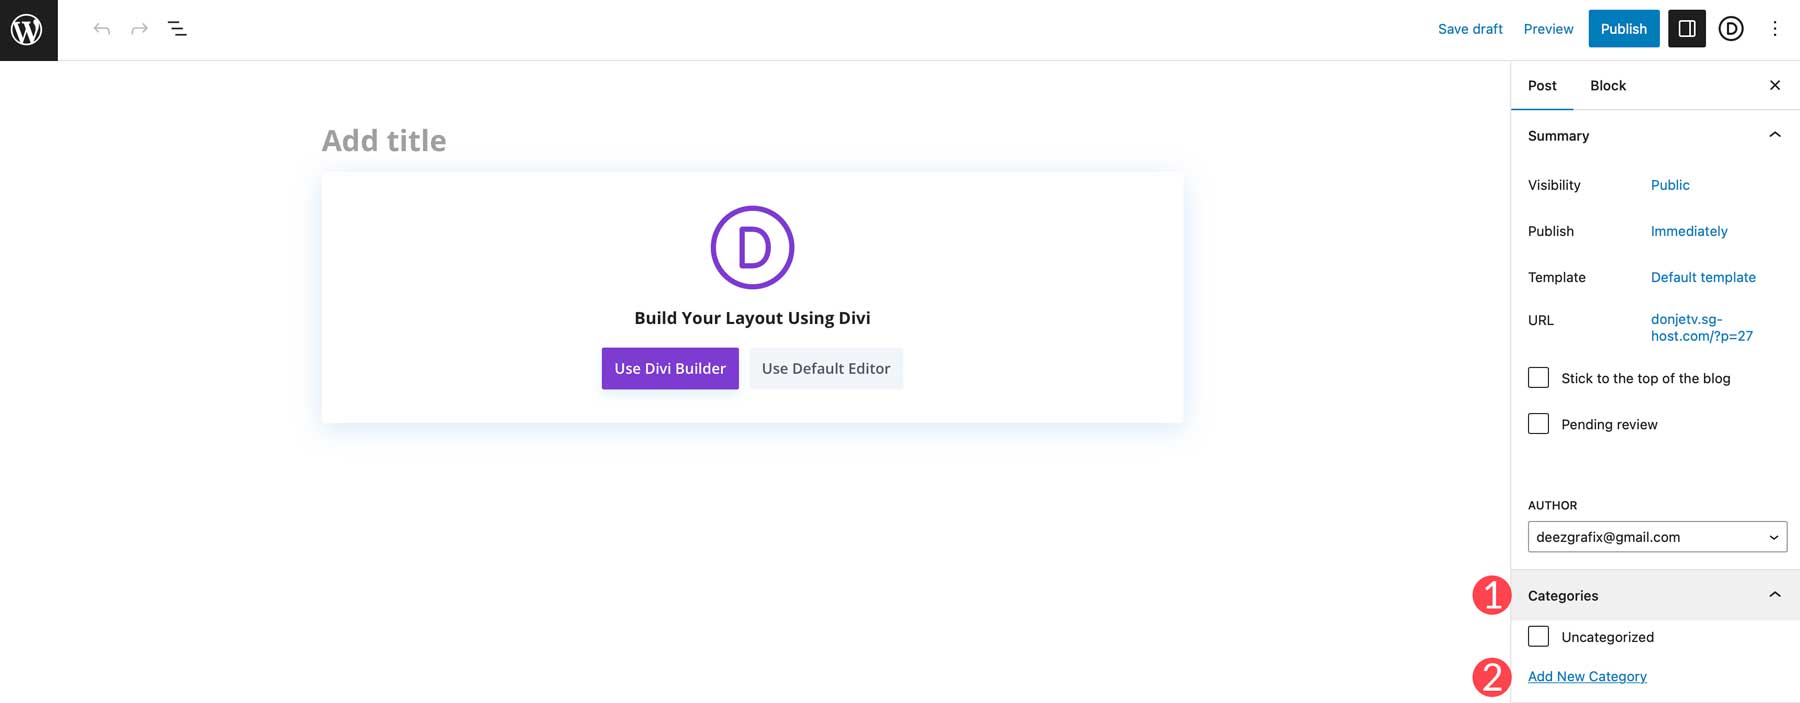
Alternatively, categories can be created on the fly at the post level. To accomplish this, click on Posts > Add New.
To add a new category at the post level, click the Categories dropdown on the WordPress editor’s right-hand side. Then, click Add New Category.
Once you have added all the categories you need, you can showcase your category list on a blog roll page in a sidebar or any other page. As a Divi user, you can even find creative ways to display them in your header or footer by using the Theme Builder.
Create Your Pages
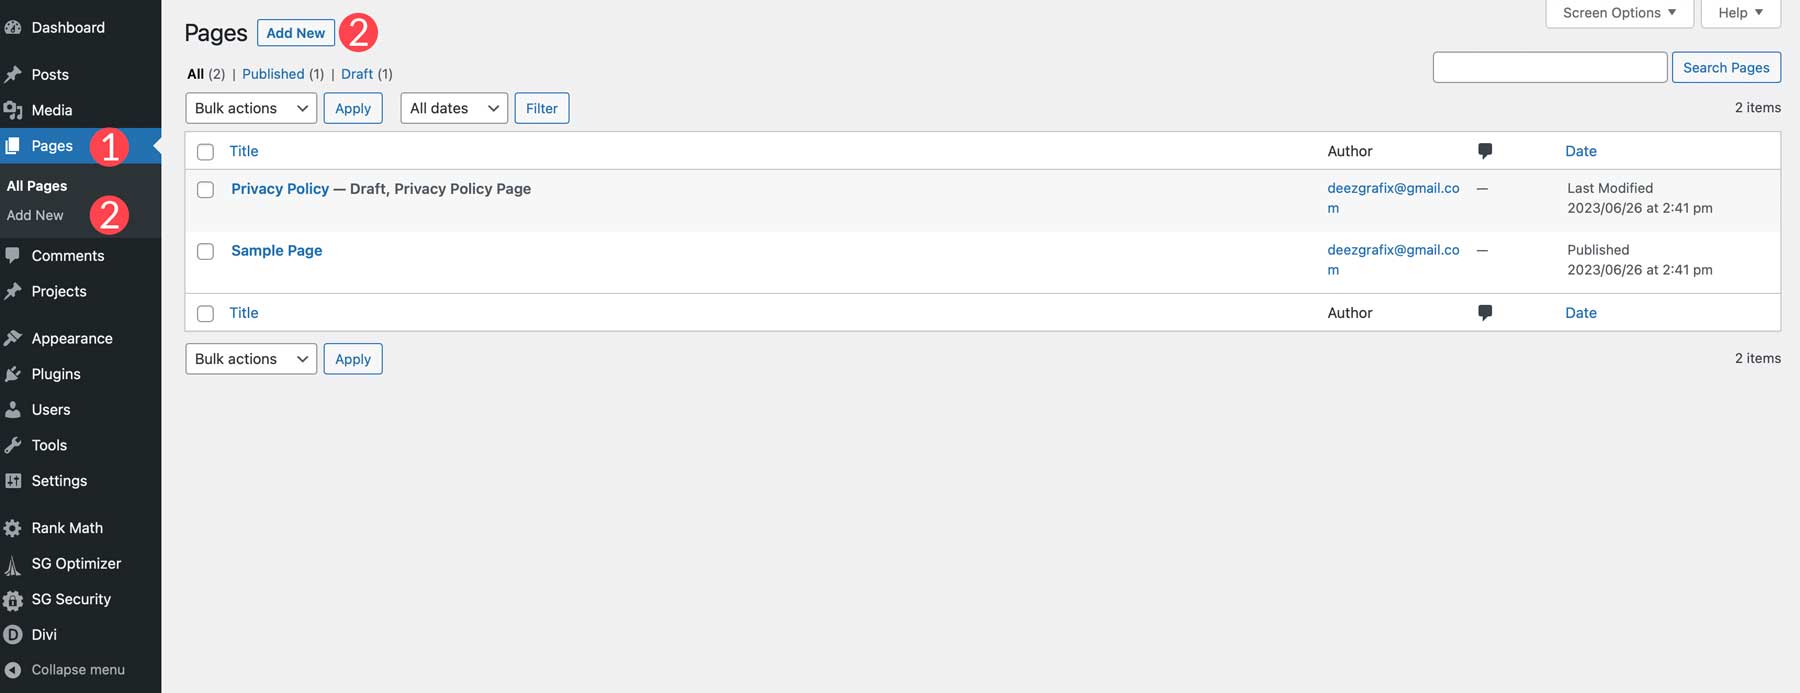
Next, we’ll use Divi to create our first page. To keep things simple, we’ll use one of Divi’s awesome layout packs. First, we’ll create the home page from the Marketing Layout Pack for Divi. Navigate to Pages > Add New in your WordPress dashboard.
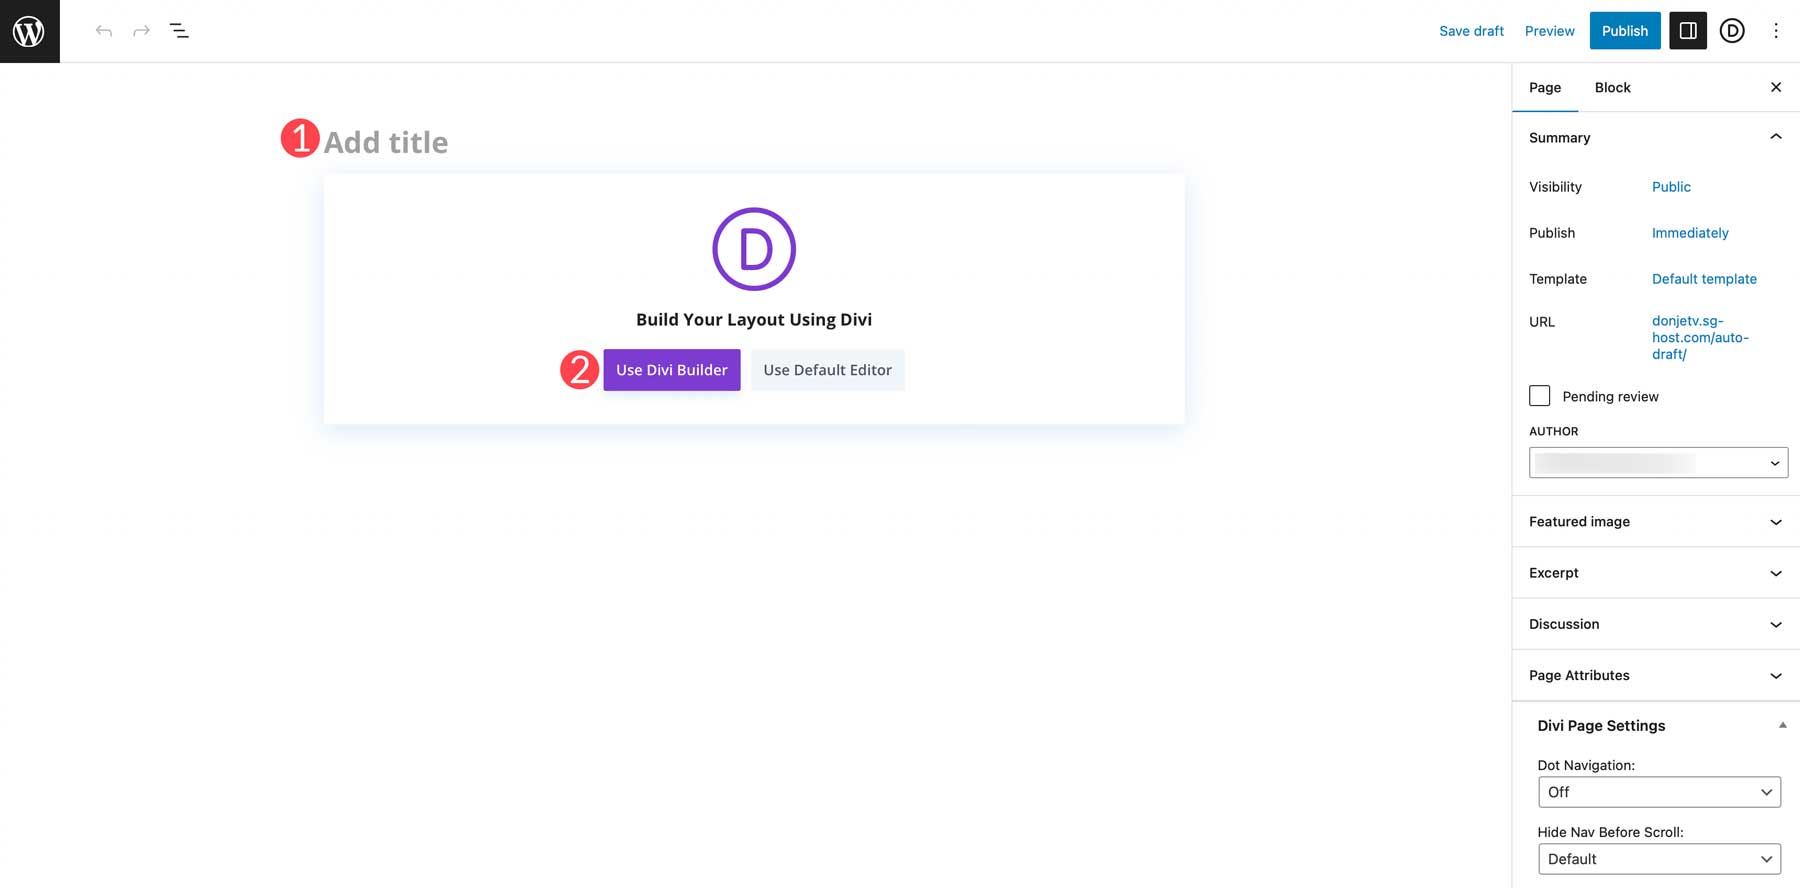
Add Home as the title, then click the Use Divi Builder button.
Next, select Browse Layouts.
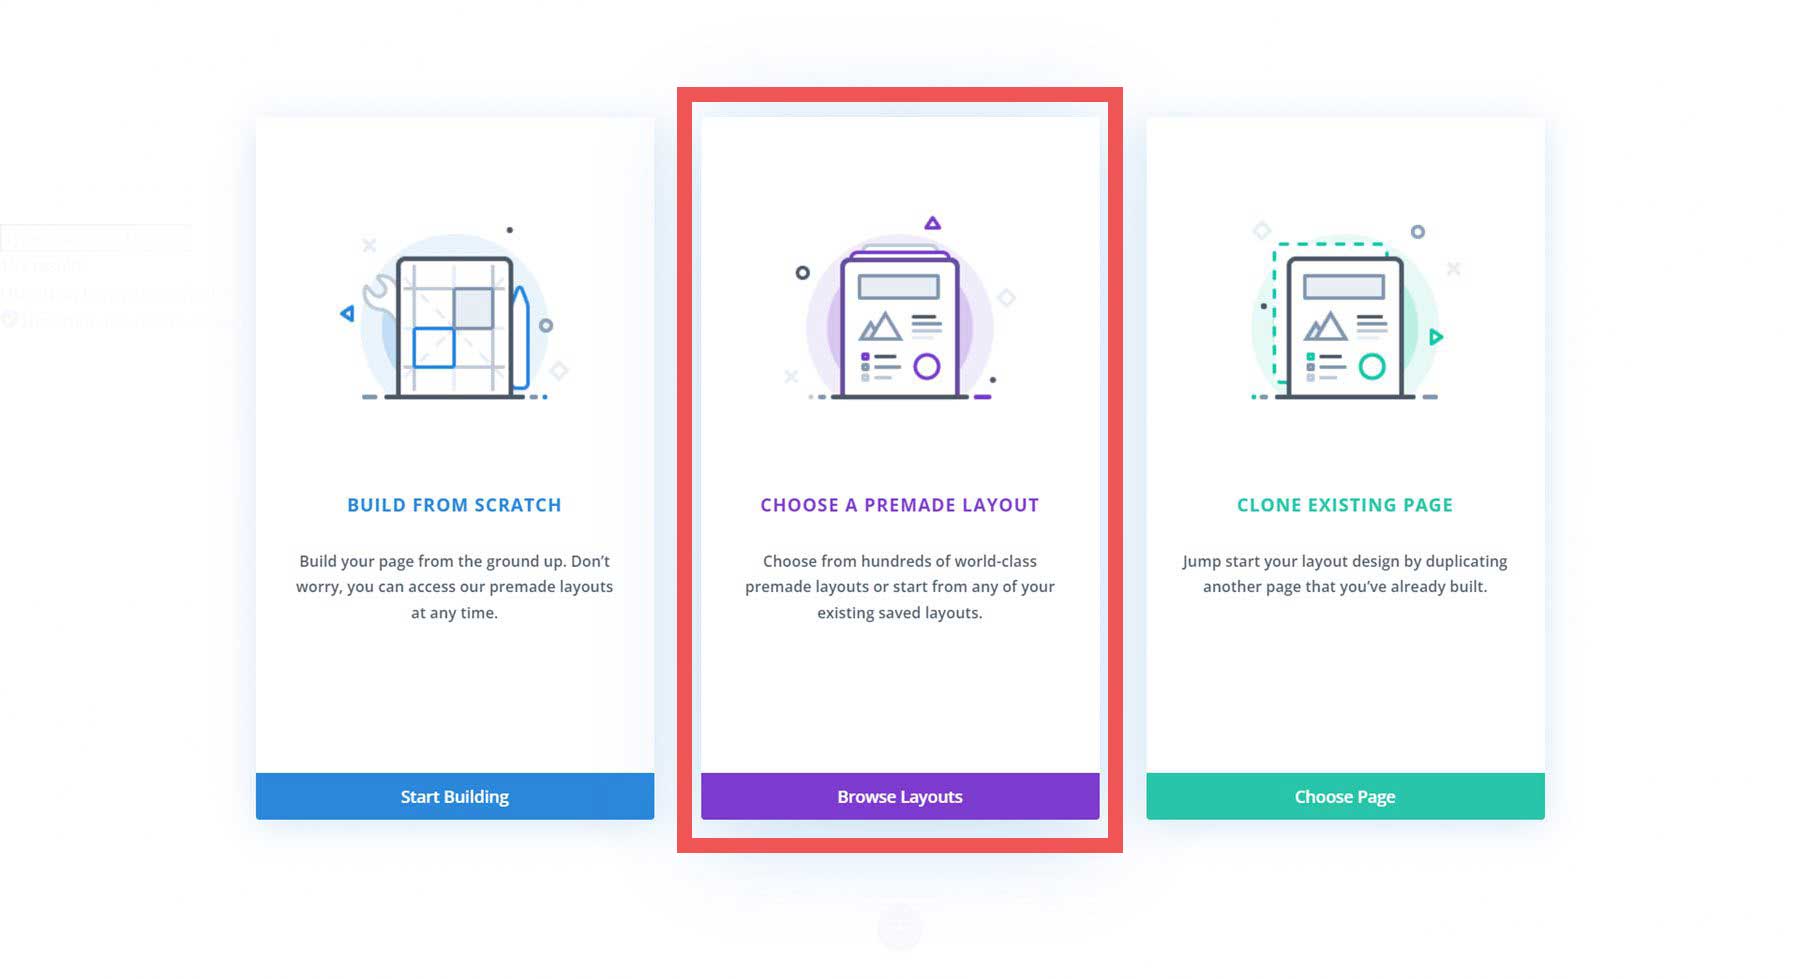
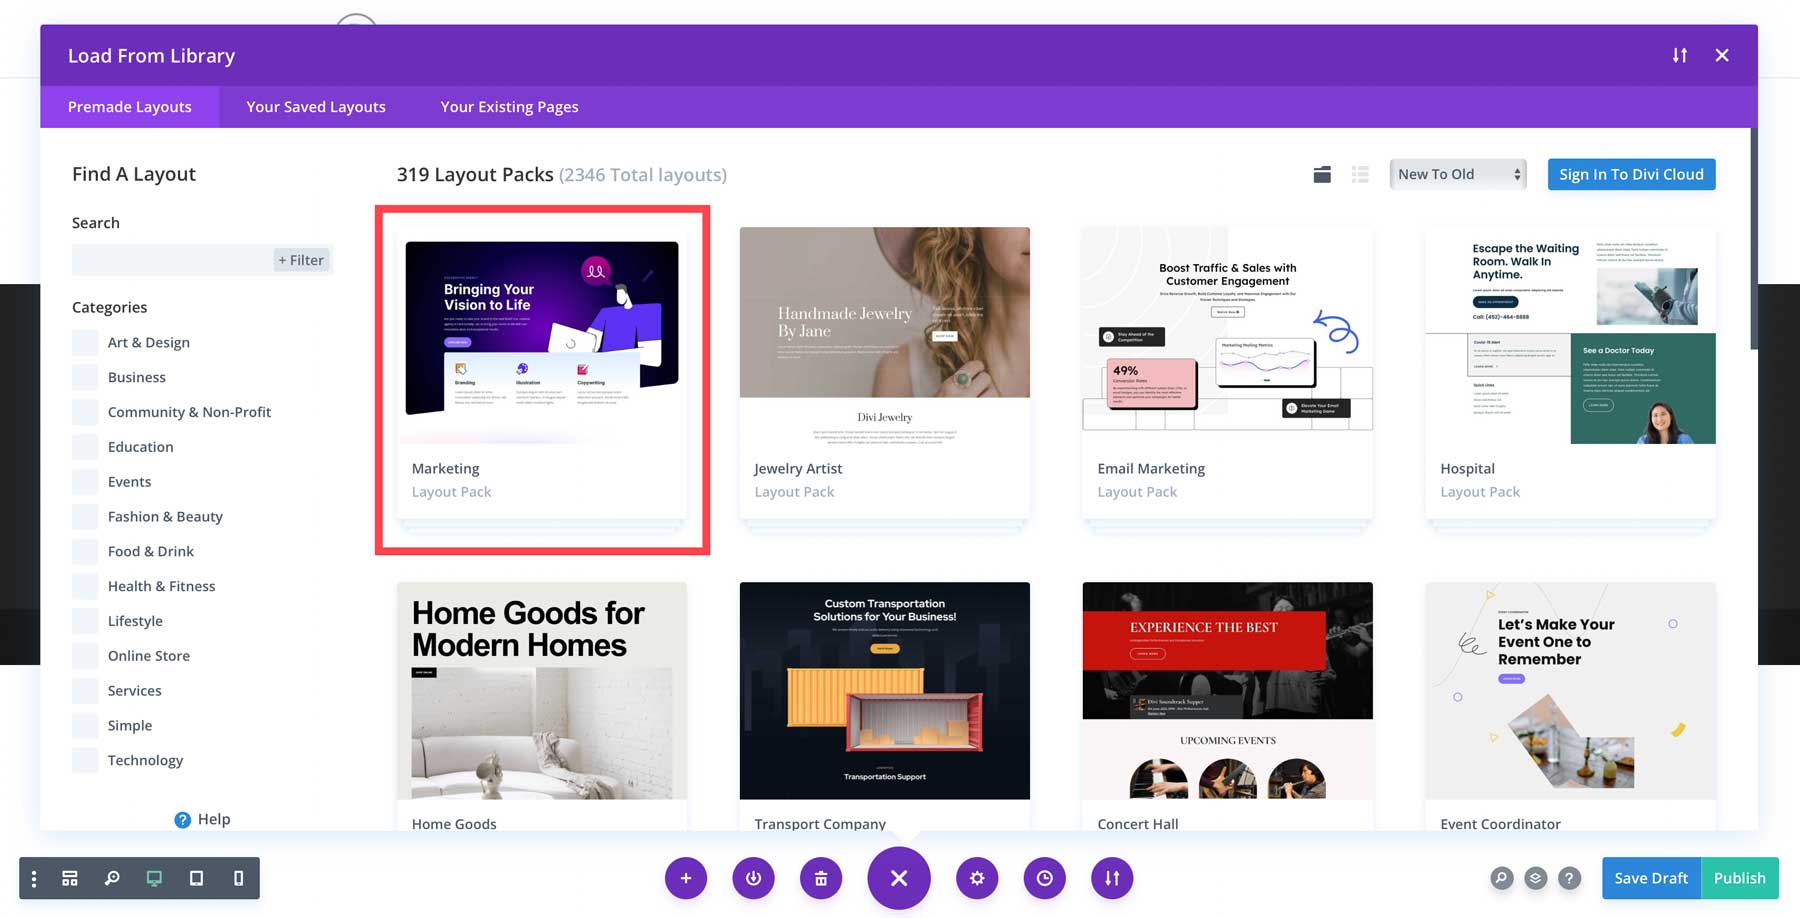
Choose the marketing layout back by clicking on it.
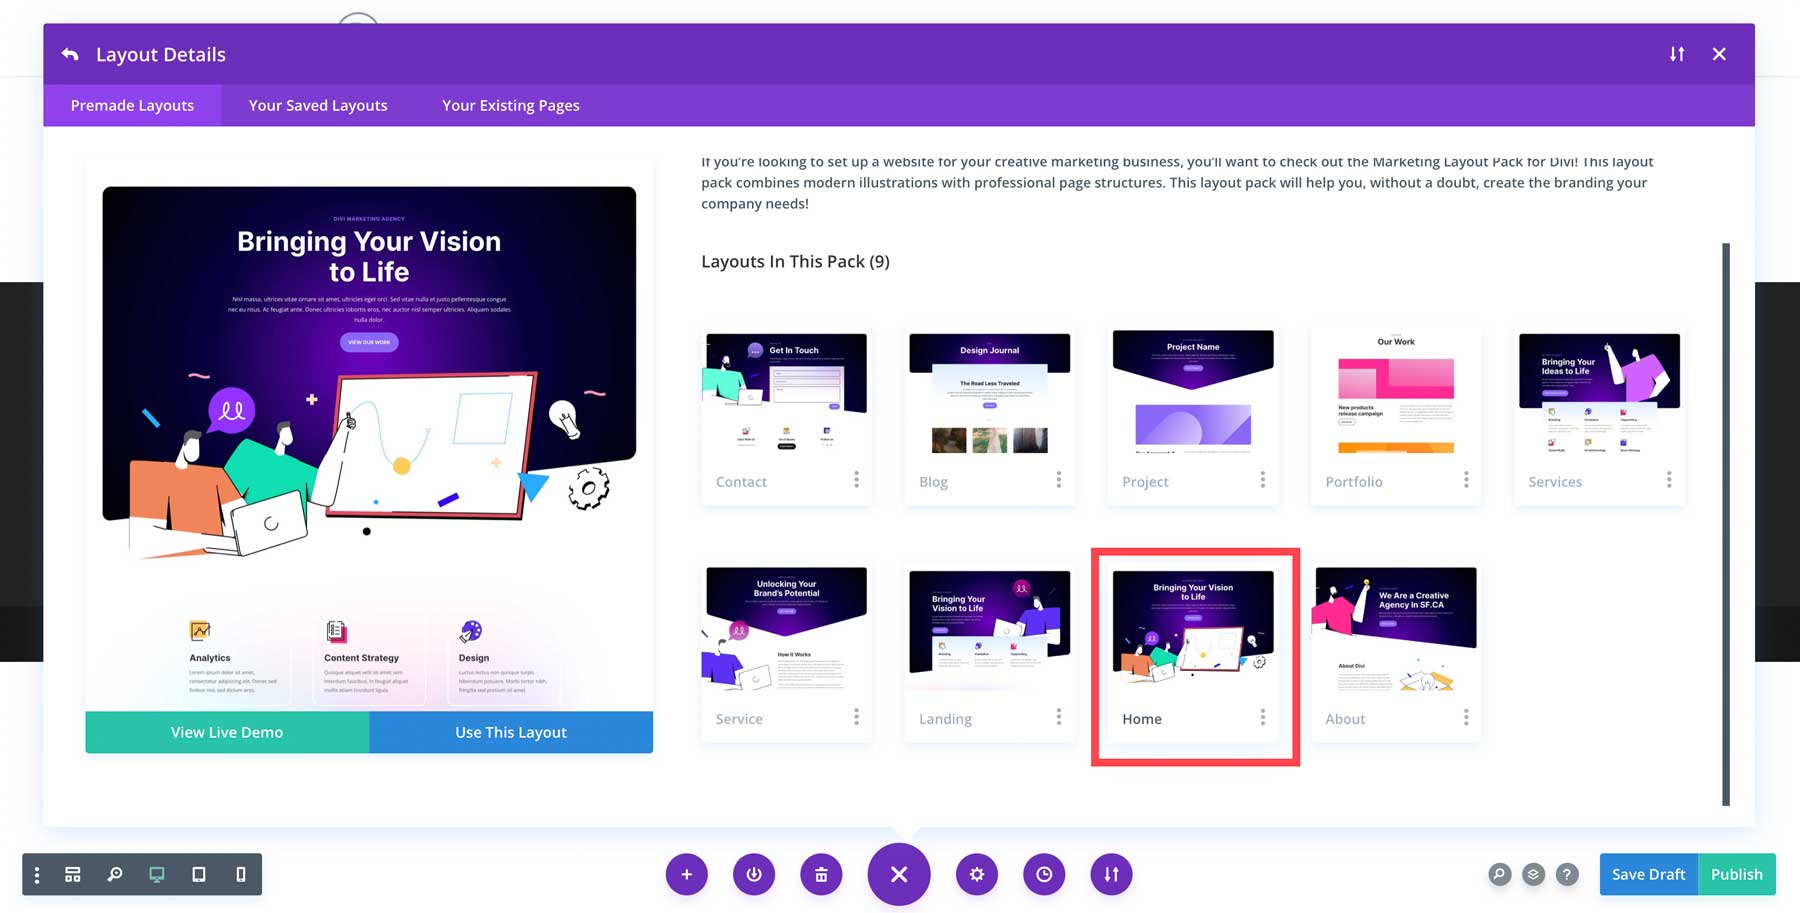
Next, click on the Homepage layout.
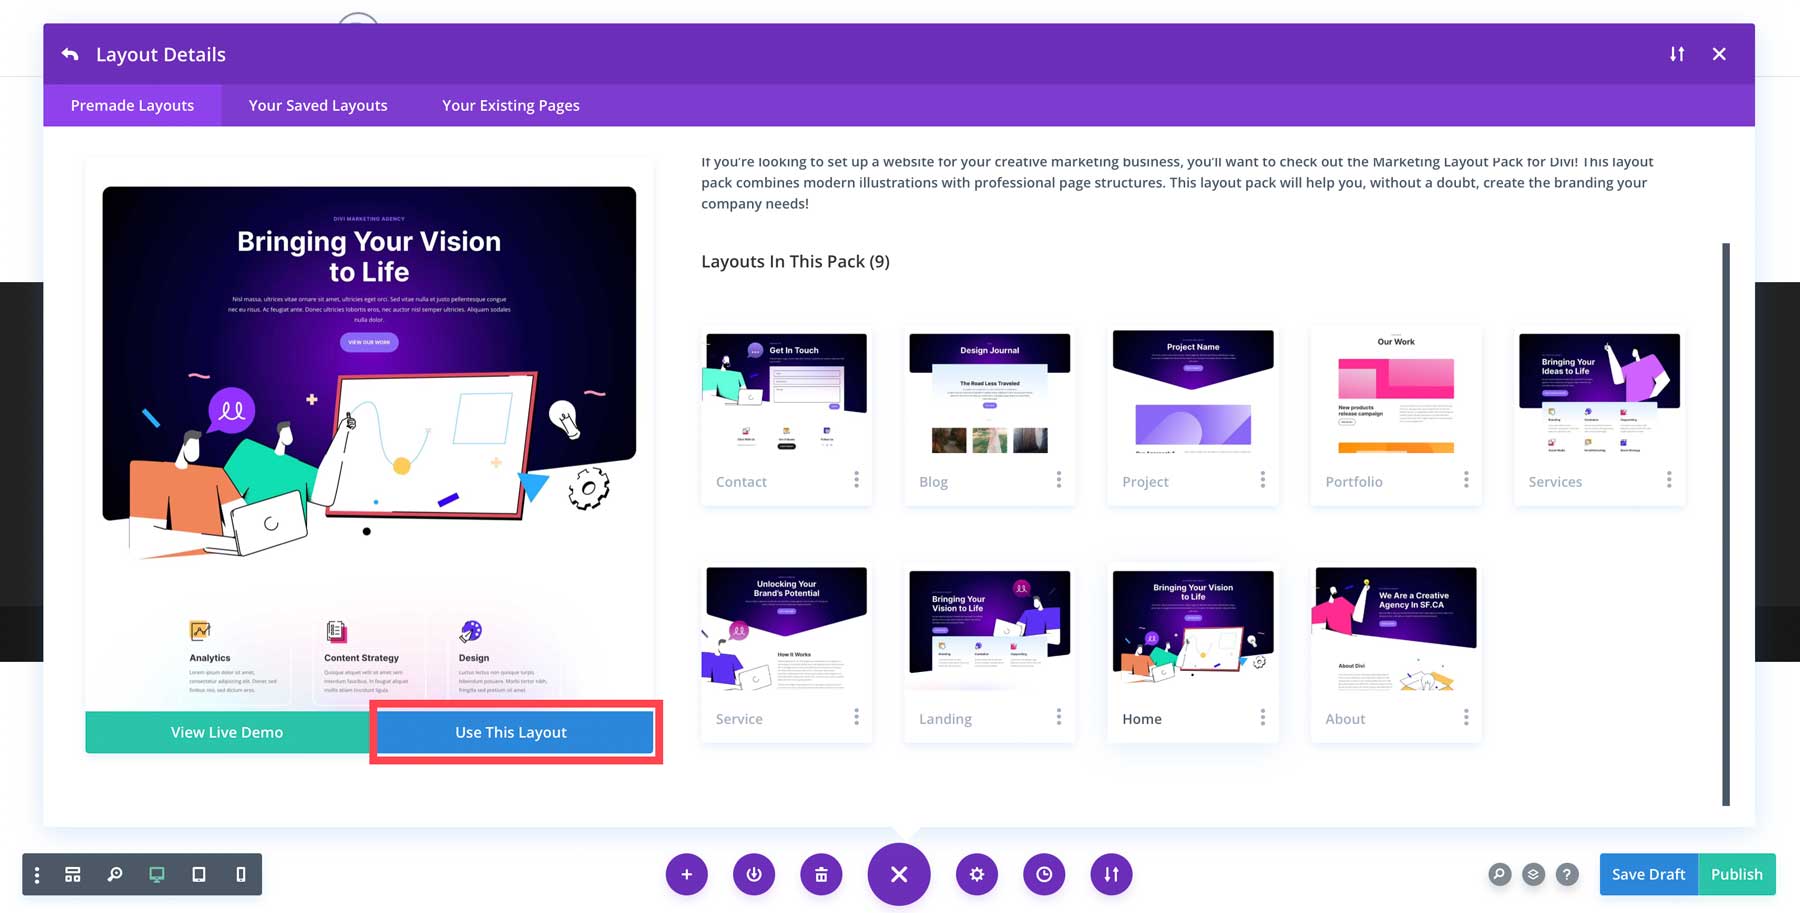
Finally, click the Use This Layout button to insert the design into your page.
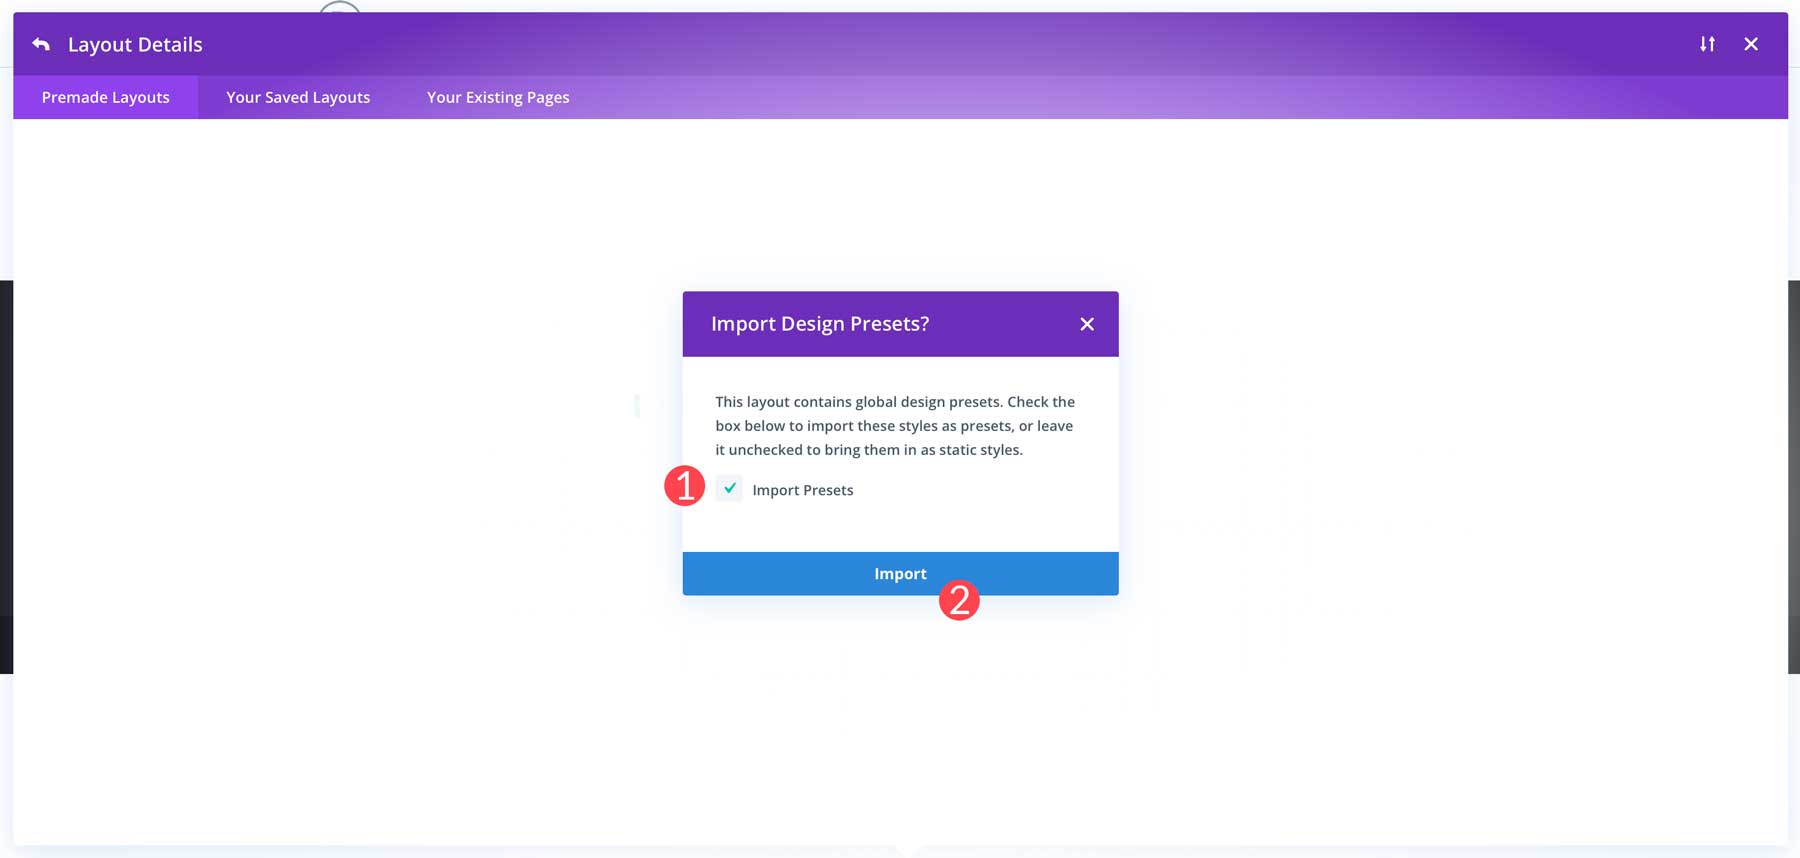
If you’d like to import the presets of the layout pack, be sure to check Import Presets, then click the Import button.
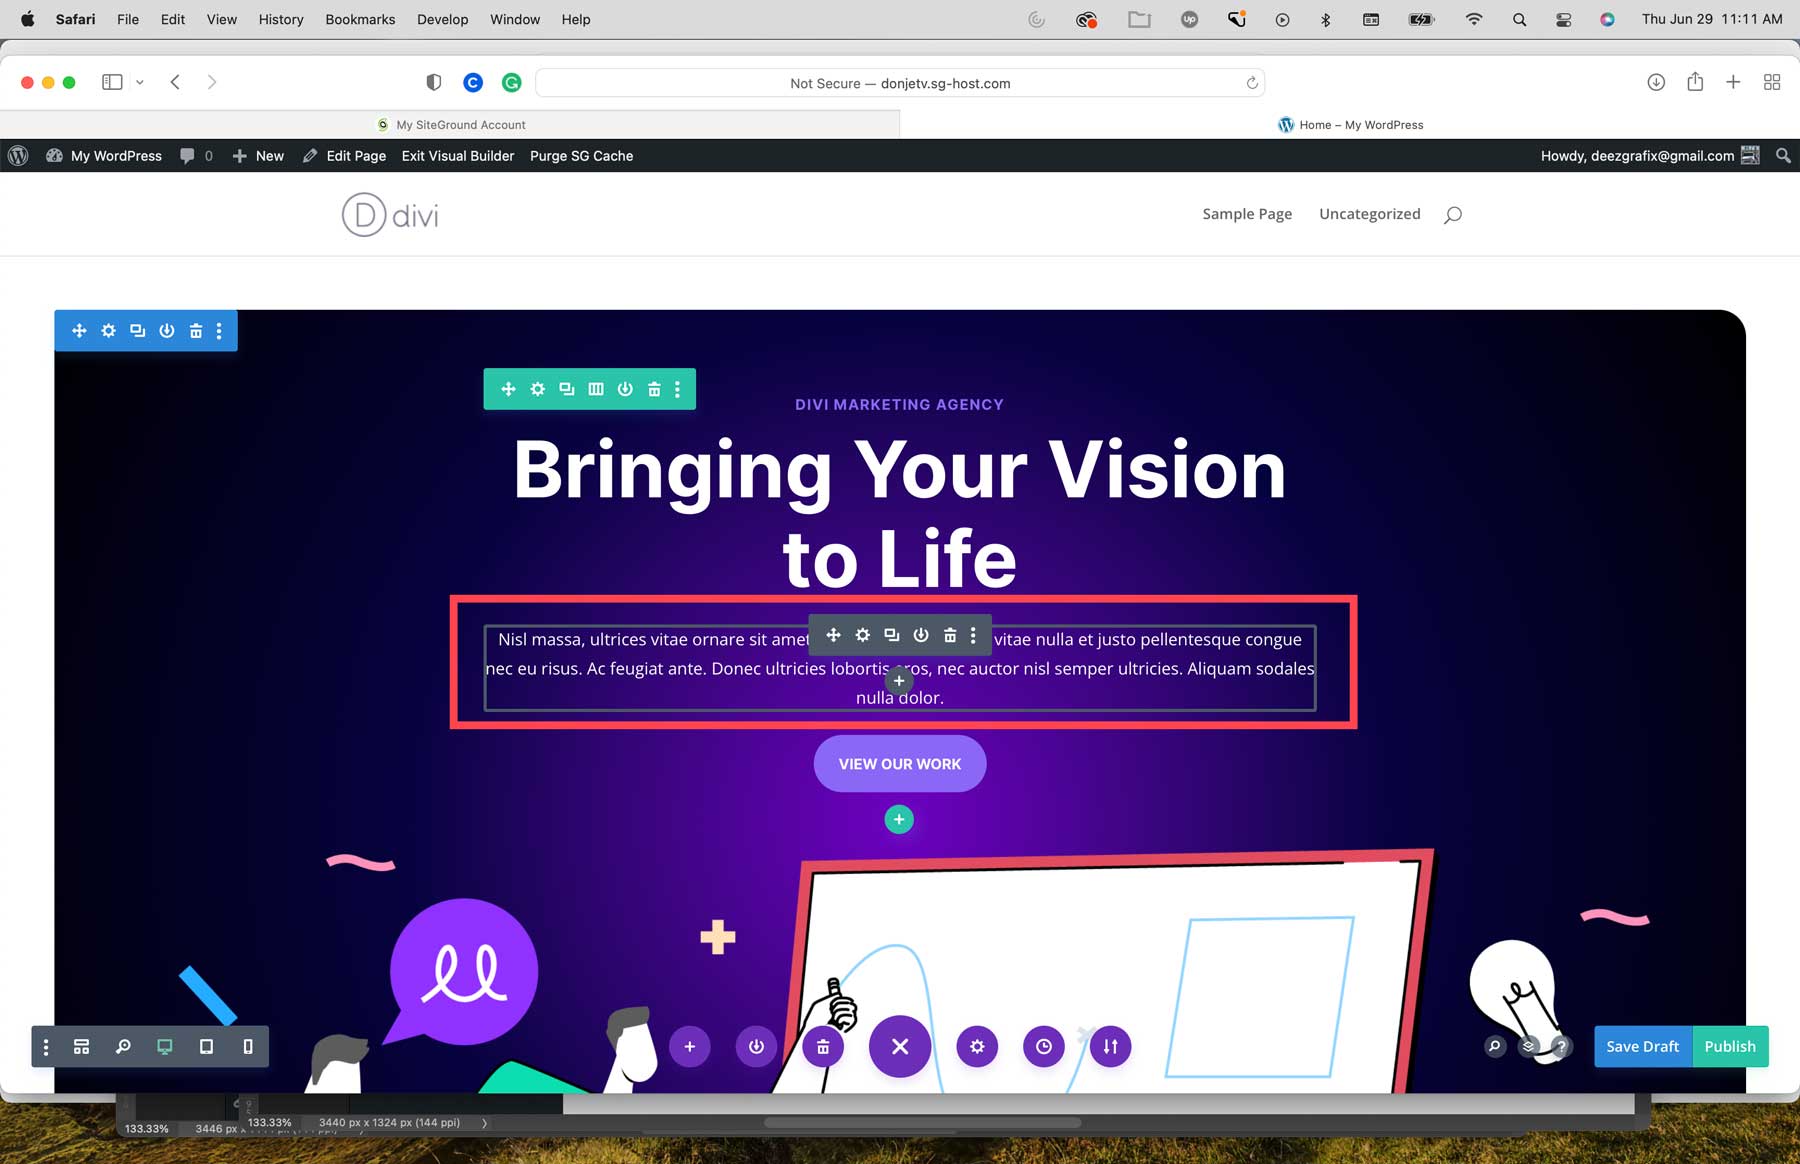
Once the page reloads, you can edit the text and images in the layout’s modules by hovering over the module you’d like to edit, then clicking the gear icon to bring up the module’s contents.
Make your edits by replacing the placeholder content in text modules.
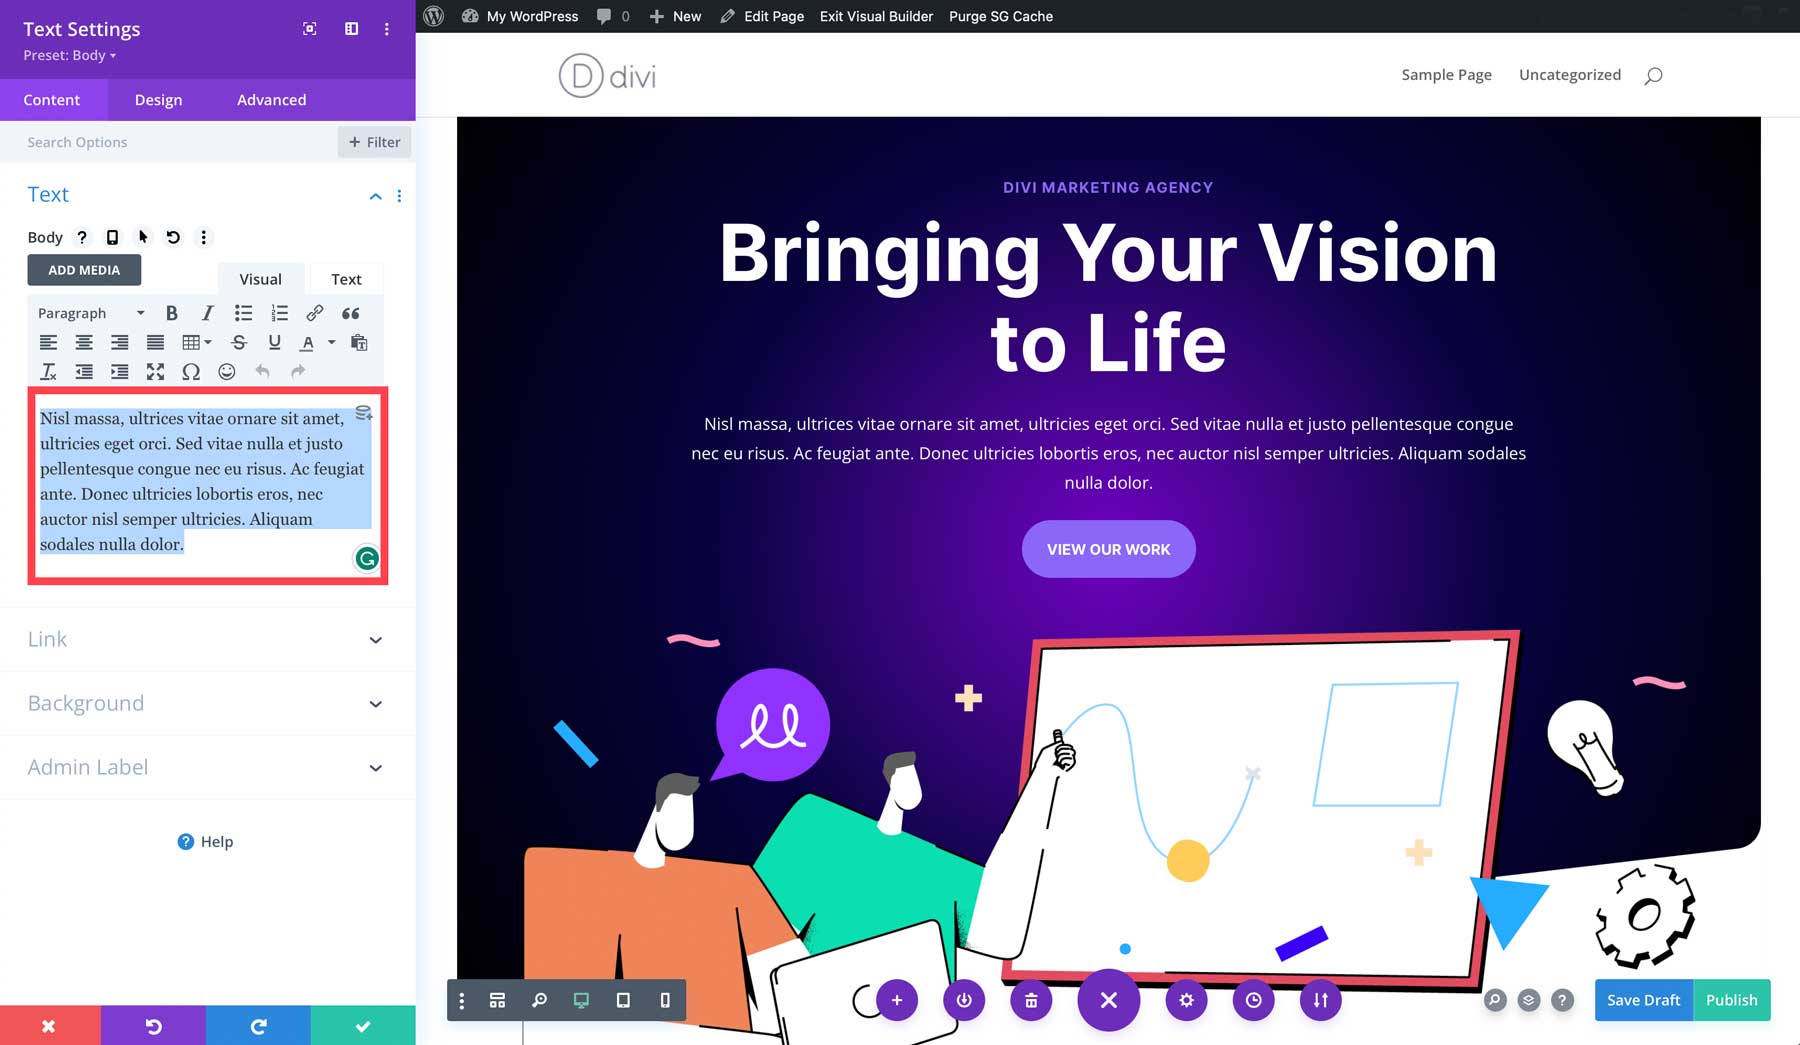
Once you’ve completed the editing process, save your draft or publish the page by clicking the corresponding button in the lower right-hand screen of the Visual Builder.

Create Your Templates
As previously mentioned, Divi’s Theme Builder allows you to create custom templates for every section of your website. Design custom headers and footers, blog post layouts, category and tag page templates, and more.
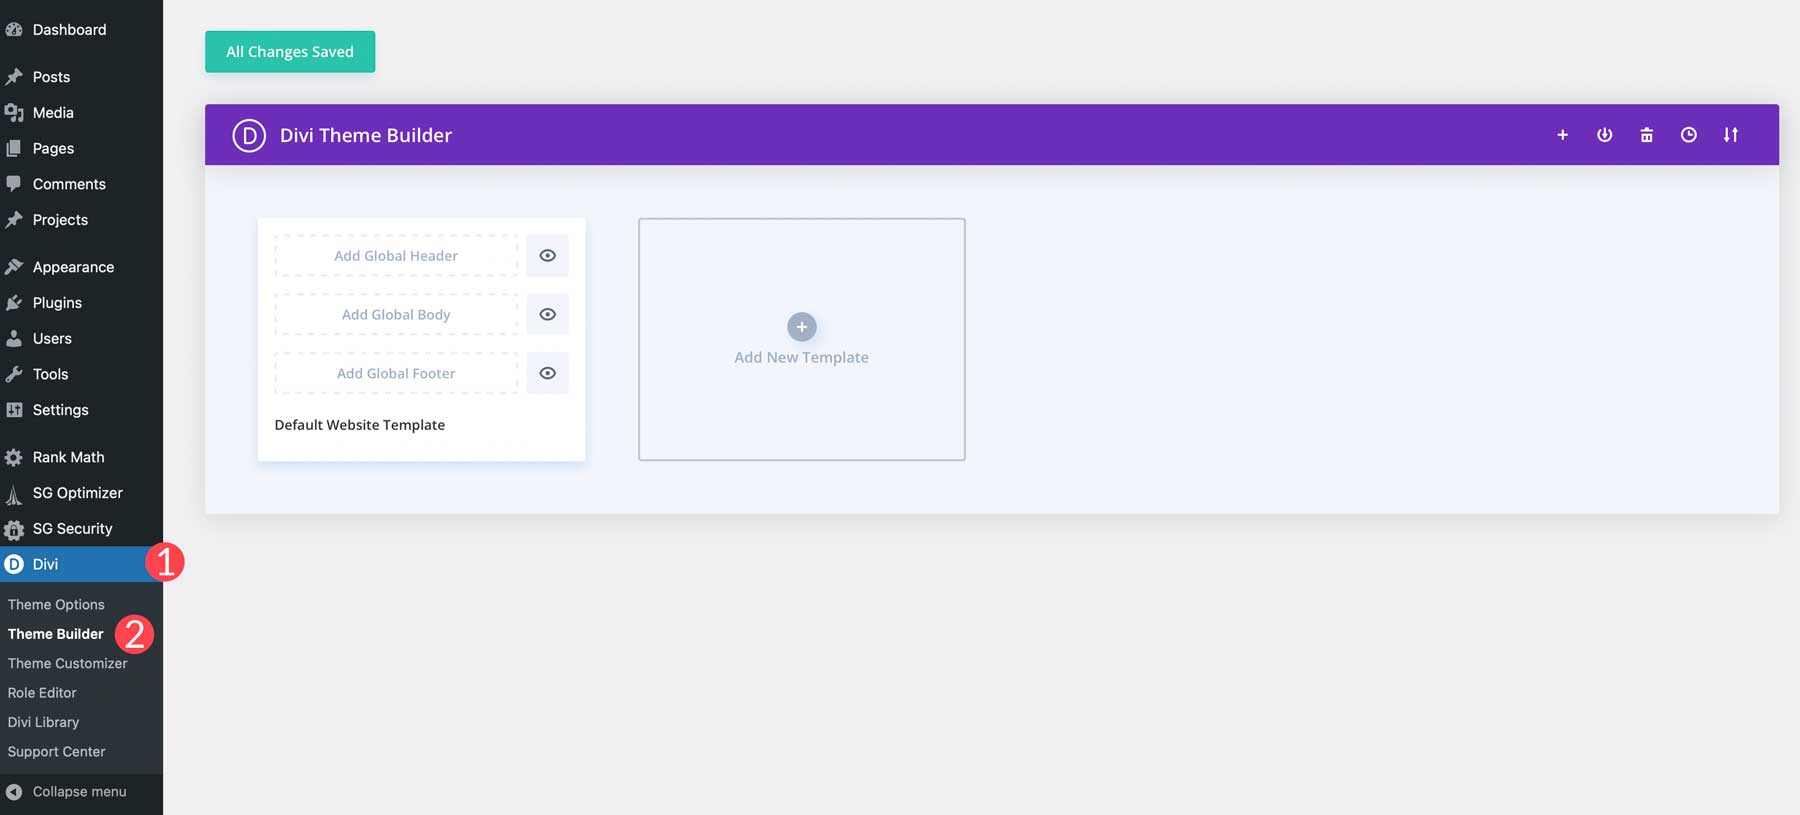
The default website template (1) is the section you’d use to create a global header, body, and footer. This allows you to create any layout to feature your blog’s navigation. To create new templates, you’ll click the Add New Template button (2). If you want to use a premade theme builder set, click the + icon (3). To save your templates, click the save button (4). The remaining icons allow you to delete (5), view your design history (6), and import or export your layouts (7).
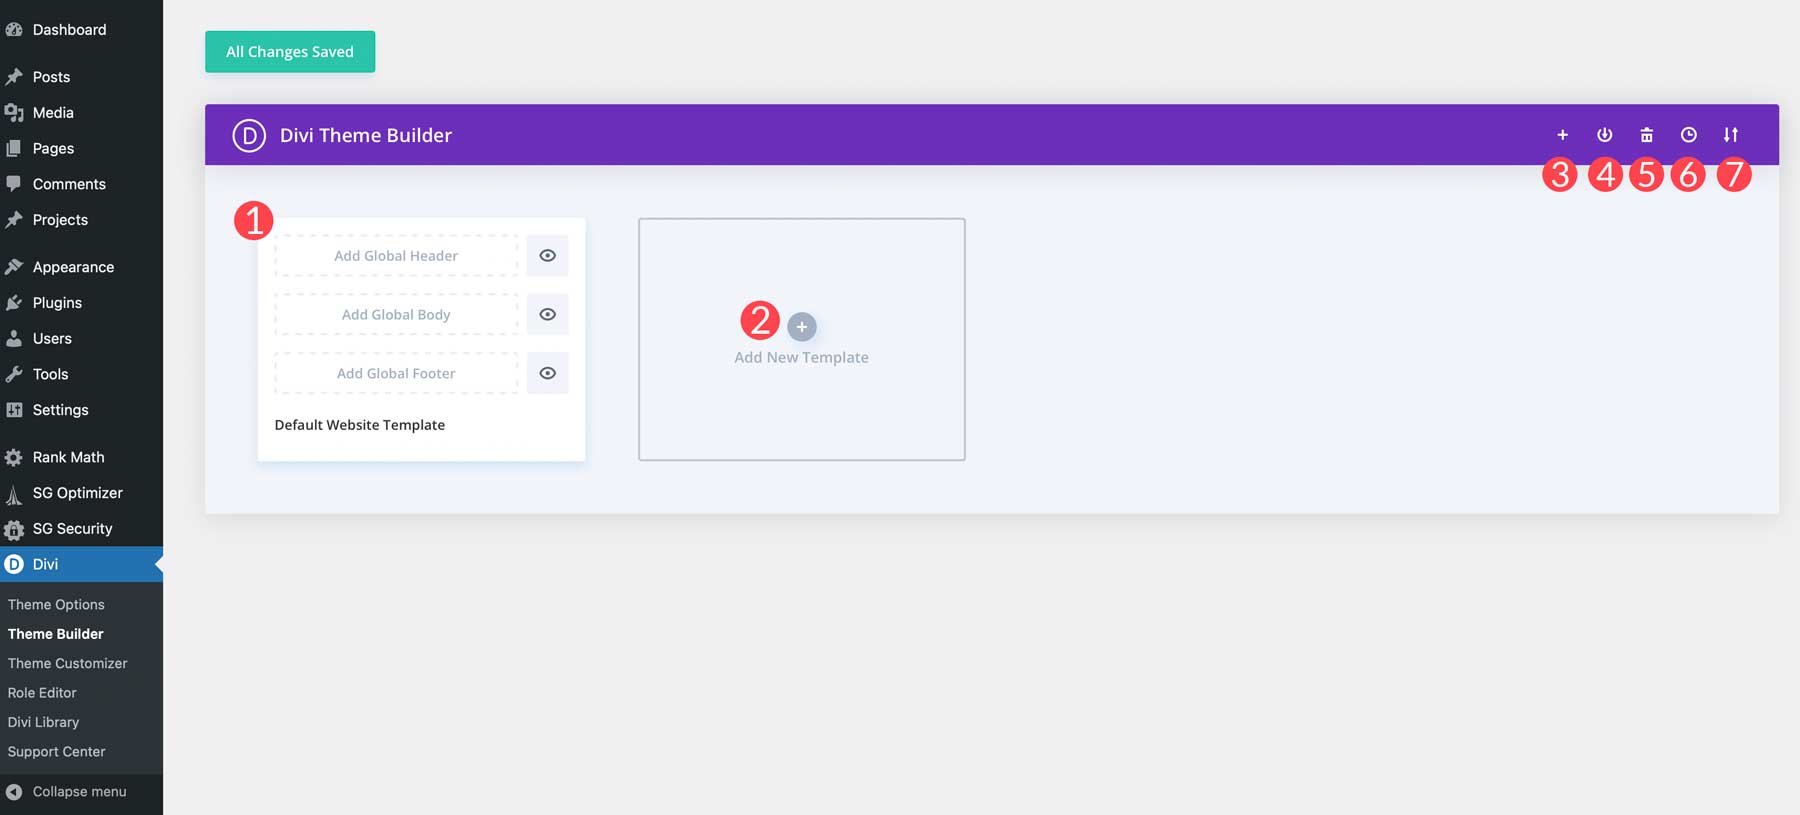
As you begin creating templates for your website, you’ll notice that multiple templates can get messy. So, take steps to organize them so they are easier to find.
Ok, on to creating your first template. Start by navigating to Divi > Theme Builder.
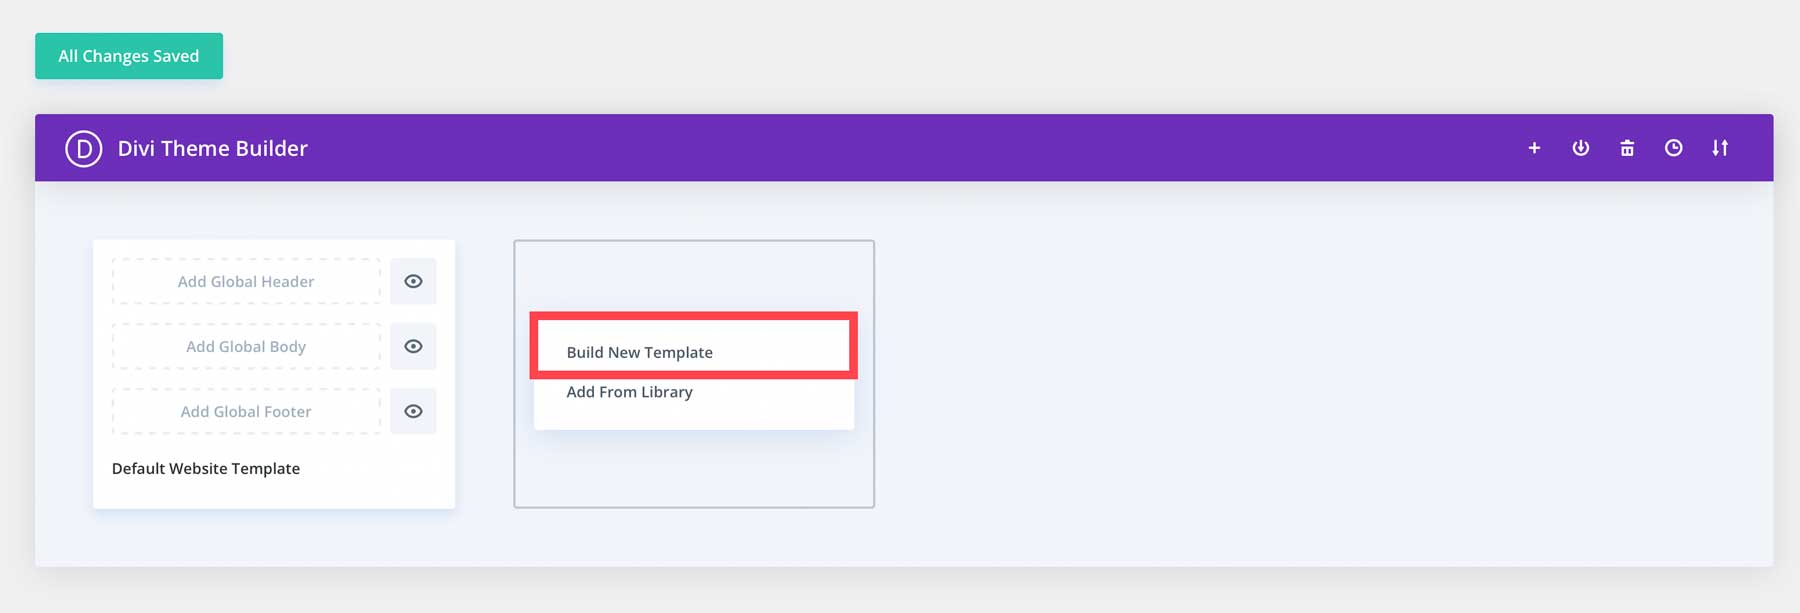
As noted, you’ll click the Add New Template button to create a template. Select Build New Template from the popup.
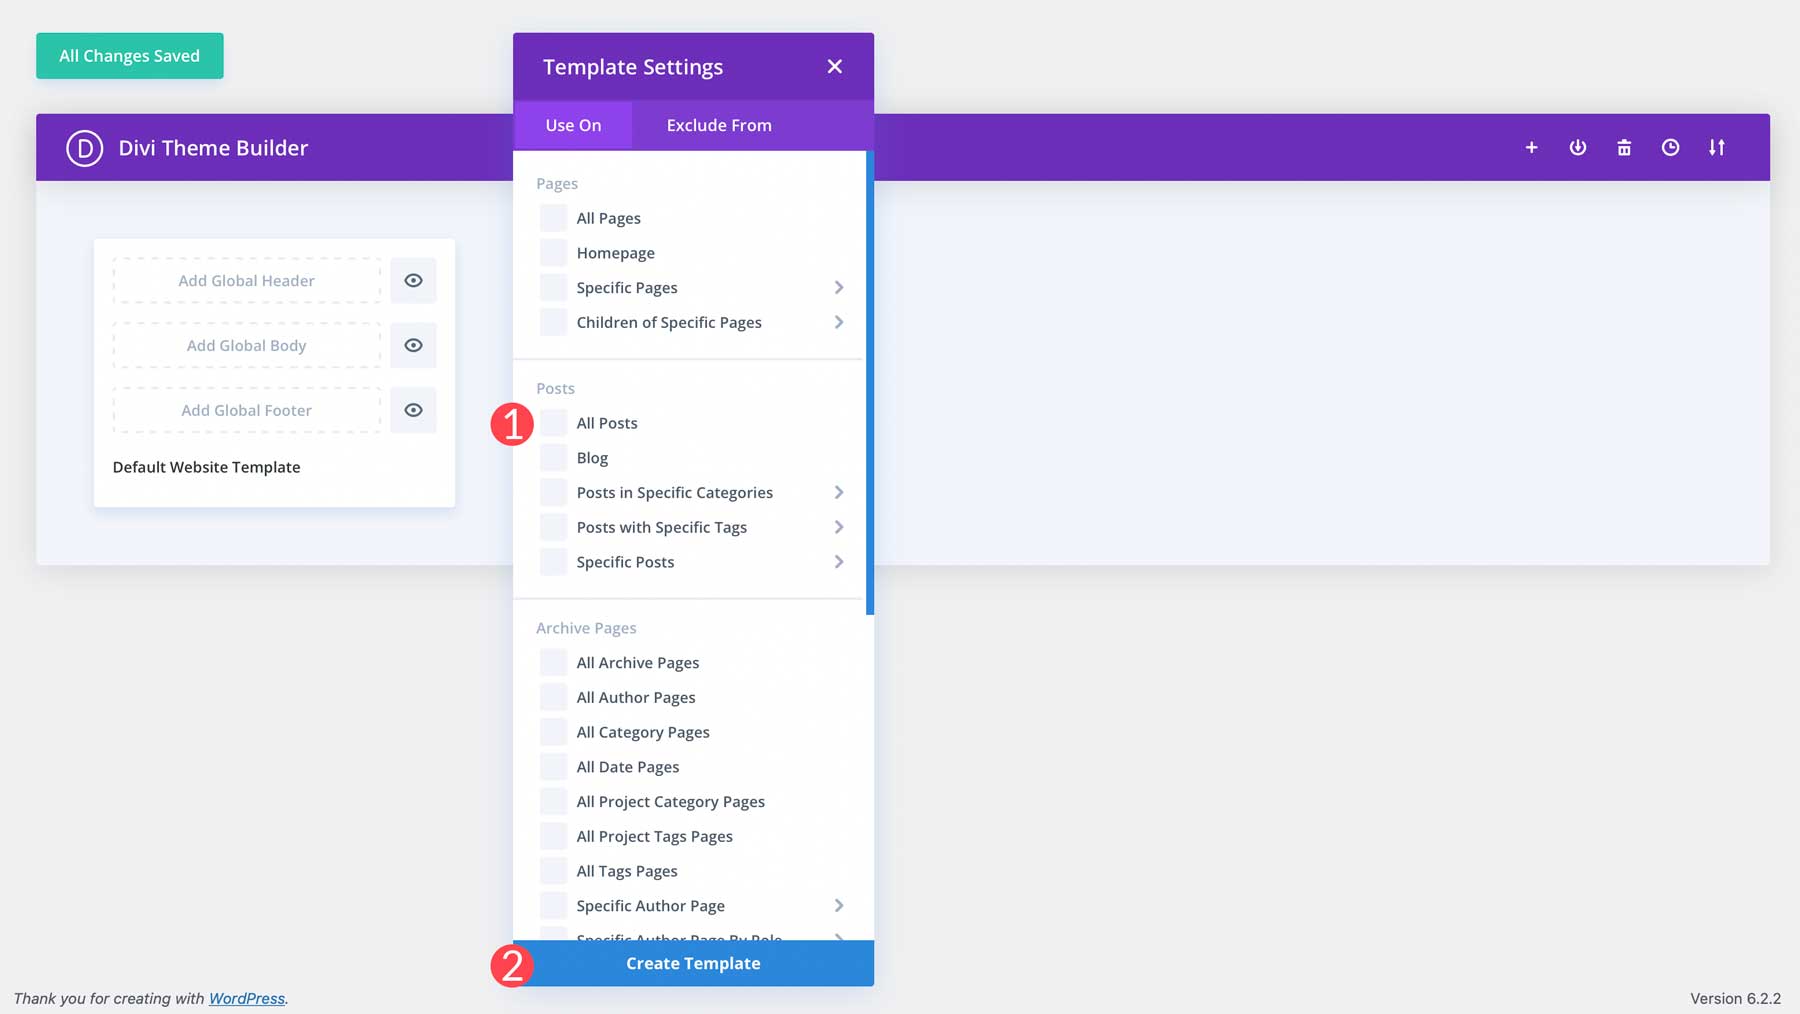
Next, tick All Posts, then click the Create template button. These selections will allow you to create a template for posts which will be applied to every post you write.
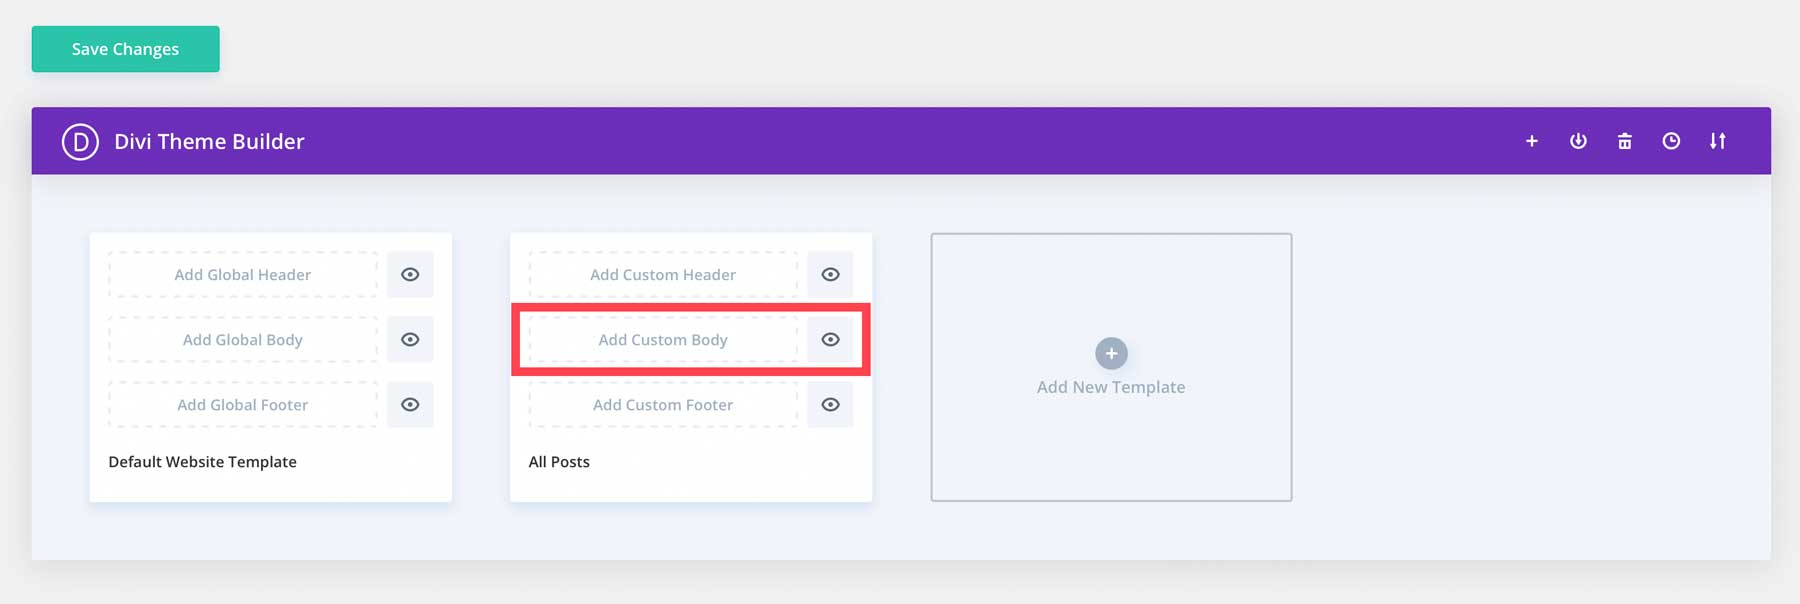
Next, click Add Custom Body in the All Posts template. Click Build Custom Body when the popup appears.
From there, you can use the Visual Builder to design a blog post template to match your site’s design.
Step 6: Create a Content Strategy
Now that your pages and blog post template are created, you can concentrate on forming a content marketing strategy. It involves creating content that is specifically related to your niche. Strategizing your content can help you get your business noticed, build a good reputation, and boost your SEO. You’ll be best served by analyzing your competition, learning about your potential audience, and conducting keyword research.
Step 7: Write Your First Post
When the time comes to write your first post, the most important thing is to focus on writing quality content. Be sure to keep your target audience in mind so that you’re delivering content that aligns with their interests. Start by organizing your thoughts, creating a blog post outline, and structuring your post to maximize your reader’s attention. Remember, writing your first post sets the tone for your blog, so take your time and make it a captivating and valuable piece that leaves a positive impression on your readers.
When writing in WordPress and Divi, there are a couple of ways to create your post, either in the Visual Builder, classic editor, or the Gutenberg editor. Since we created a template for our blog posts, the easiest route is using Gutenberg. It functions much like the word processors of the past, allowing you to directly type text, or use blocks to add other content.
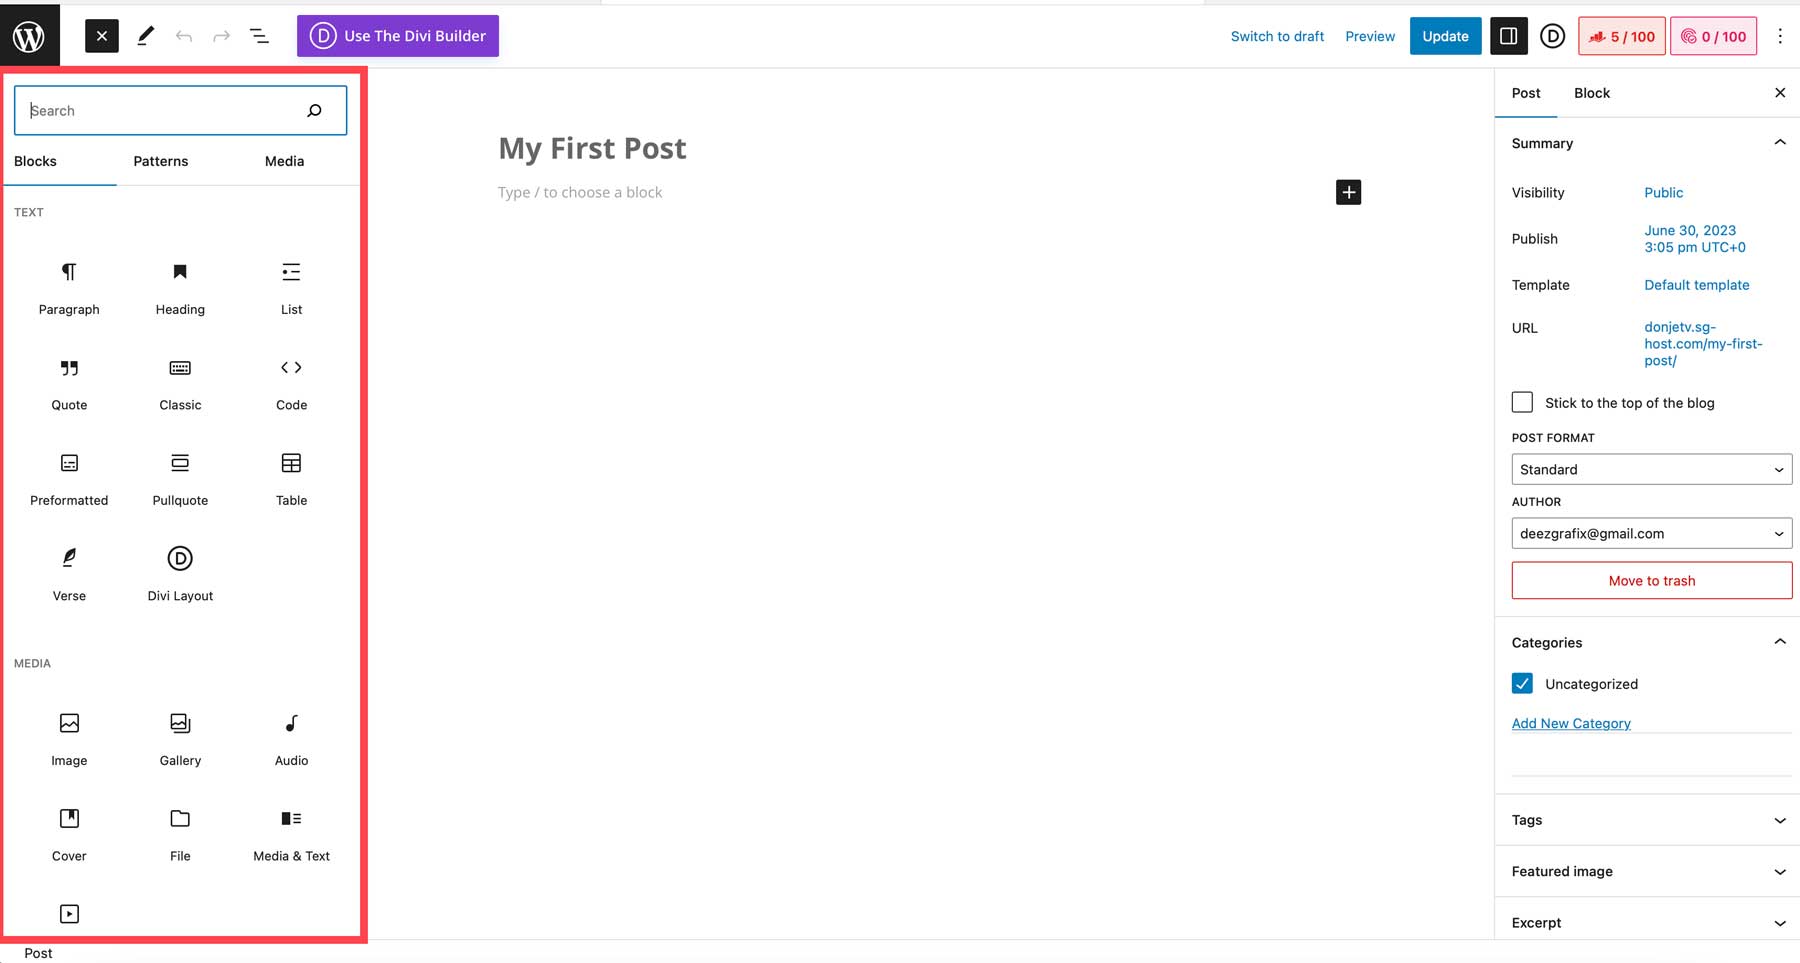
If you find yourself suffering from writer’s block or need a little help crafting a good headline or outline for your post, consider incorporating a good AI writing software to help jumpstart your creativity.
Once you’ve added all of your content, you can easily make your post live by clicking the Publish button.
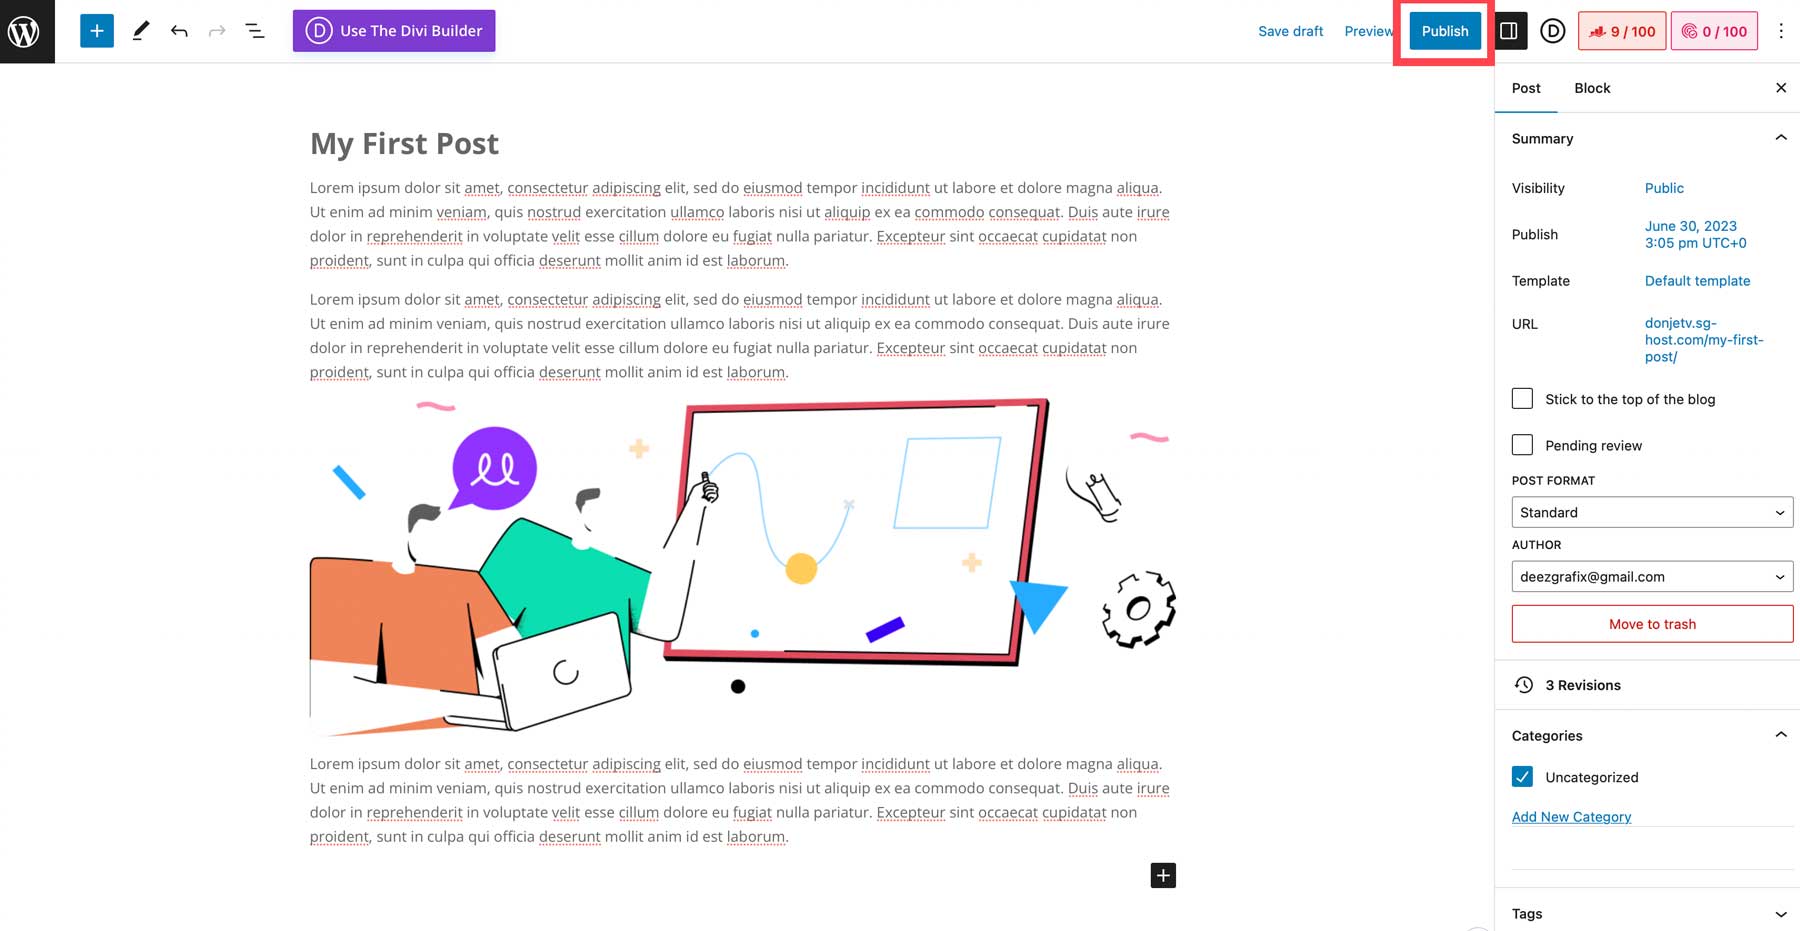
Step 8: Optimize Content for SEO
You can write the best content in the world, but you’re missing the mark if you aren’t optimizing for SEO. To optimize your content, start by using a good keyword strategically throughout your post, avoiding keyword stuffing. It’s also important to add alt tags to your images, ensure that you’re using headlines properly, and keep your paragraphs concise, yet engaging.
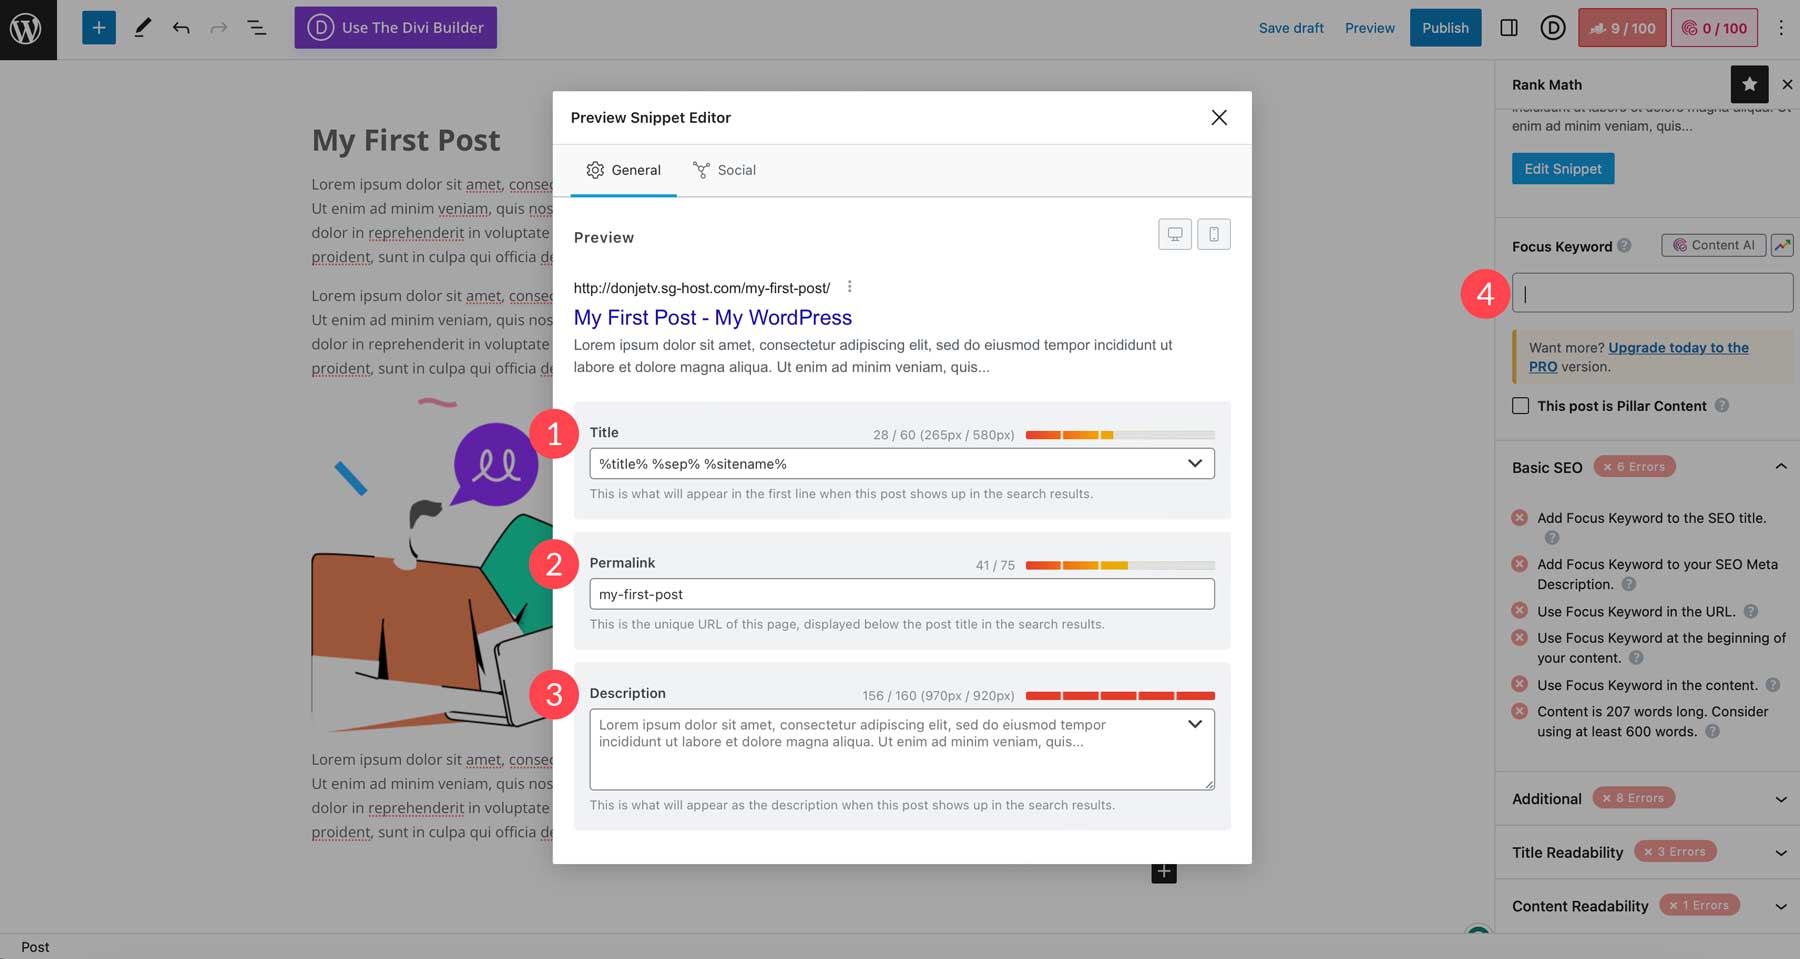
Additionally, pay close attention to on-page SEO elements such as titles, permalinks, and meta descriptions, as they contribute to search engine visibility. Finally, ensure that you’re focusing on mobile SEO, considering more than half of all internet users utilize a smartphone to navigate the internet.
To help you keep a handle on things, consider incorporating a good SEO tool, such as SEMRush, in addition to your chosen SEO plugin.
Step 9: Post Content Consistently
Next, you’ll want to plan how often you release new posts. Set a regular posting schedule that works for you and your target audience, whether weekly, bi-weekly, or monthly. A good editorial calendar plugin helps you plan how often to release new content and helps to keep track of your goals. By establishing a good routine, you create expectations for your readers to keep them coming back for more.
Step 10: Monetize Your Blog
Once you have established a solid foundation and built your audience, you can take steps to generate income with your new blog. One popular method is through native advertising, where you can display ads or sponsored posts anywhere on your blog to earn revenue based on clicks or impressions.
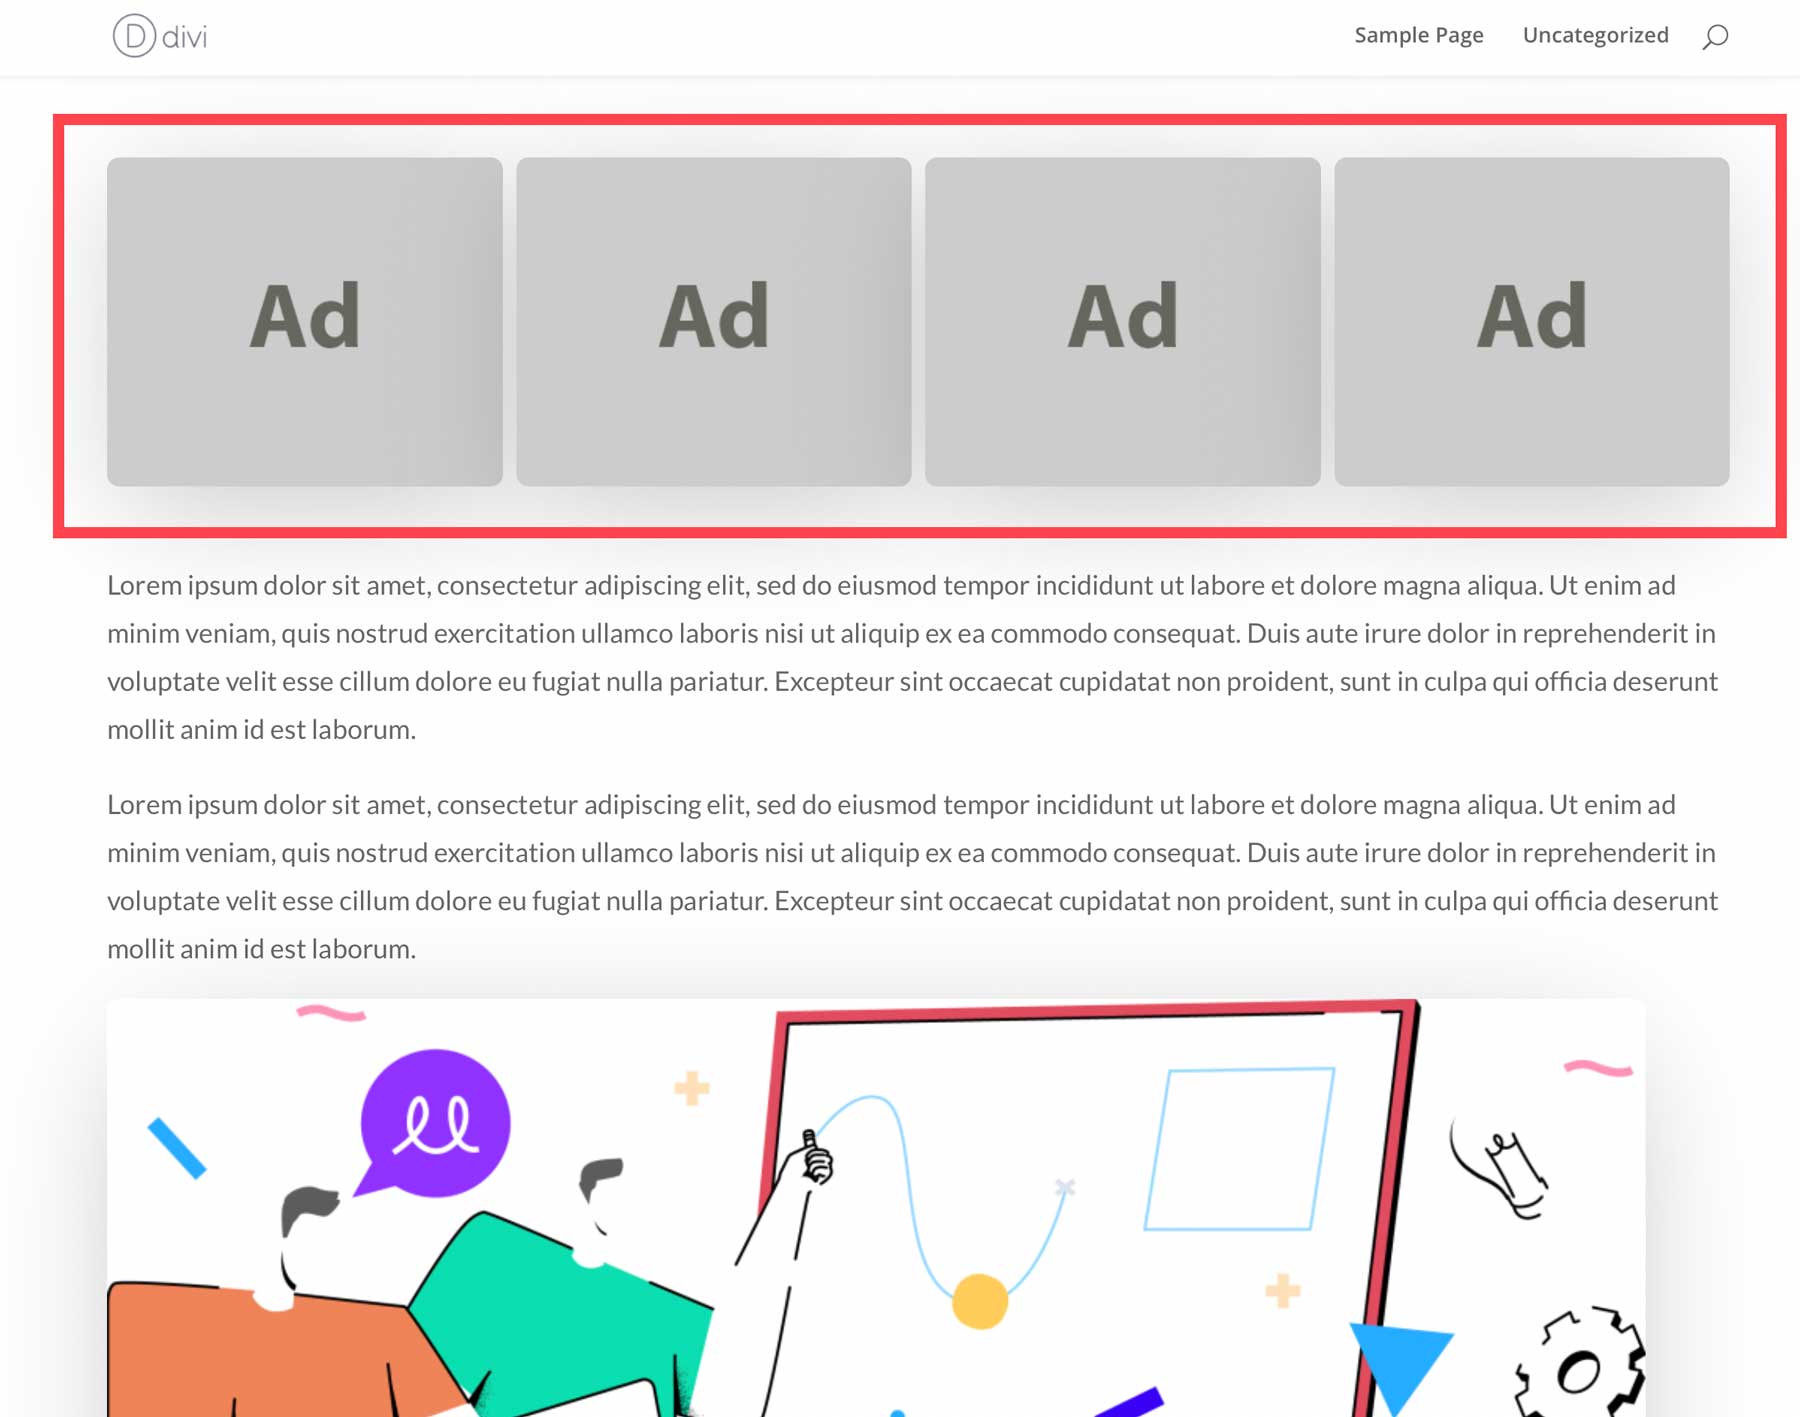
Another option is affiliate linking, where you promote products or services to earn a commission for every sale. Remember that choosing affiliate partnerships that align with your niche is important to provide value to your audience.
You’ll also want to incorporate a good affiliate marketing plugin to help disguise ugly links, gain access to reporting, or offer discounts on purchased products.
Final Thoughts on How to Start a Blog
Starting a successful blog requires careful planning, dedication, and consistent effort. By following our step-by-step process, you can establish a strong foundation for your blog and increase your chances of success. It begins with setting a clear goal and identifying a niche that truly resonates with your audience. As you progress, partnering with a reputable host like SiteGround provides a reliable platform for your blog to thrive. Remember the importance of optimizing your blog for search engine optimization (SEO) to ensure maximum visibility. Let’s not forget about the exciting prospect of income-generating opportunities that can put some cash in your pocket.
Are you looking for more tutorials? Check out a few Divi-related how-to’s to kick your new blog into high gear:
Frequently Asked Questions (FAQs)
Before we wrap up, let’s answer some of your most common questions regarding how to start a successful blog. Did we miss one? Leave a question below, and we will respond!
How do you start a blog?
How do I make my blog successful?
To make your blog successful, consistently produce high-quality content that caters to your target audience, promote your blog through social media and other channels, engage with your readers through comments and feedback, and optimize your blog for search engines using relevant keywords and tags. Analyze your blog’s performance and adjust your strategy to increase traffic and engagement.
Why should I use WordPress to blog?
WordPress is a powerful, user-friendly blogging platform with numerous customizable themes and plugins. It offers many features, including SEO optimization, mobile responsiveness, and social media integration. WordPress has a large community of users who provide support and resources, making it an ideal choice for bloggers of all skill levels.
What are the factors to consider when choosing a name for my blog?
When choosing a name for your blog, consider factors such as the theme or niche of your blog, the potential audience you want to attract, the uniqueness and memorability of the name, the availability of the domain name, and any potential trademark or copyright issues.
How do I come up with topics to write about?
To develop topics for your blog, start by understanding your target audience and their interests. Research industry trends, read other blogs, and use tools like Google Trends to identify popular topics. Brainstorm ideas with colleagues and clients, and don’t be afraid to tackle controversial or niche subjects. Finally, evaluate the success of past blog posts and adjust your strategy as needed.
What skills are needed to become a successful blogger?
To become a successful blogger, one needs to have excellent writing skills, creativity, time-management skills, knowledge of SEO, social media marketing skills, basic knowledge of website design and development, adaptability to new trends, consistency in publishing quality content, and ability to engage with the audience.
Is WordPress better than Blogger?
WordPress is generally better than Blogger as it offers more customization options, better SEO capabilities, and a wider range of plugins and themes. It also has a larger community of developers and users, making it easier to find support and resources. However, Blogger is free and simpler to use, which may make it a better option for beginners or those with limited budgets.
How can I make money blogging?
To make money with blogging, focus on generating high-quality content that attracts traffic, building a loyal audience, and monetizing your blog through various methods such as ads, affiliate marketing, sponsored content, and offering products or services. Consistency, networking, and blog promotion are key factors in increasing your earning potential.
How can I make my blog popular?
To make your blog popular, create high-quality content that engages readers. Promote your blog on social media and other platforms. Build relationships with other bloggers and guest post on their sites. Engage with your audience by responding to comments and encouraging feedback. Stay consistent with your posting schedule and use keywords to optimize search engine rankings.
Where should I host my blog?
What are the top WordPress plugins for bloggers?
What’s the best WordPress theme for blogging?
Featured Image via Fonstra / Shutterstock.com


